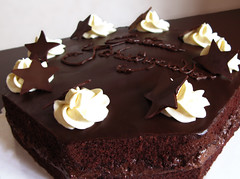
29 July 2007

Sacher Torte

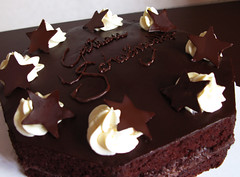
For my mom's last dinner party, she wanted me to make a dessert, but I knew I couldn't repeat desserts (that would be a wasted opportunity!). So I decided to go with a classic, Sacher Torte. It's a famous cake from Vienna, invented in 1832 by Franz Sacher. It consists of a chocolate butter cake made by the combination method, filled with apricot preserves, and frosted with a thin bittersweet chocolate glaze (in my case it was a ganache). I used Wolfgang Puck's recipe, a true Austrian if I've ever seen one. The glaze recipe was a little thicker than I'd expected and I didn't get a very smooth finish, but the taste was undeniably there. I had reserved a slice which would photograph better than this whole cake but my dad ate it, and he's not even a chocolate or dessert fan. (recipe follows)
Sacher Torte
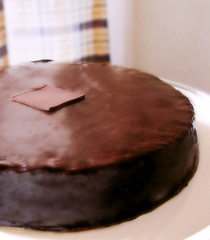
Melt 6 ounces bittersweet chocolate with 6 tablespoons unsalted butter in a microwavable bowl in the microwave on HIGH, stirring every 15 seconds until it's melted and smooth. In a medium-sized deep bowl, beat 4 egg yolks with 3 tablespoons granulated sugar until light and airy, about 5 minutes. Beat in the butter-chocolate mixture and very gently fold in 1/3 cup all-purpose flour. Set aside.

In a medium-sized clean stainless steel bowl, beat 5 egg whites with 1/4 teaspoon salt until soft peaks form. Beat in 5 tablespoons granulated sugar gradually until stiff, glossy peaks form. Fold one-third of the whites into the chocolate mixture to lighten, then fold in the rest of the egg whites until incorporated. Pour into a greased and lined 9-inch cake pan (I suggest lining the bottom and sides as well), then bake in a preheated 175°C (350°F) oven for 40 minutes or until a cake tester in the middle comes out clean. Turn out to a rack and cool. I messed up the top of the cake, so I flipped it over so the bottom is the top of the finished cake with no problem.

Purée 1/2 cup apricot preserves in a blender to get rid of chunks. Split the cake horizontally into 2 and spread the preserves in between. Replace the top layer.

In a small microwavable bowl, nuke 1/4 cup heavy cream until it boils, about 1.5 minutes on HIGH. In a separate microwavable bowl, melt 6 ounces bittersweet chocolate with 2 tablespoons unsalted butter on HIGH, stirring gently every 15 seconds until smooth. Stir the boiled cream into the chocolate gently as not to introduce any bubbles.

Place the filled cake on a rack set over a sheet pan. Pour the chocolate glaze over the center of the cake, using an icing spatula to guide the flow over the sides and to even the glaze out. Smooth the glaze on the sides with the icing spatula. Refrigerate the cake until serving time.

27 July 2007

Onion Confit

One of my friends, let's call her "Faith", shudders at the thought of onions. At least, she will hate most of its applications (which is why you don't mention the ingredients of stuff to her). I haven't yet asked if she still hated the stuff, but I can understand why some people would be averse to onions. I on the other hand will pick out a (cooked) onion and eat it. Me being addicted to sweets as it is, I find ways to make savory things have a hint of sugar in it. Onions have natural compounds (I'm not sure if it's Alliacin) that, when heated, are transformed into sugars. When I came across this topic on the eGullet forums, I knew I had to try making my own Onion Confit.
Onion Confit
It begins with a working slow cooker. I think the only other uses we have had for it are Kalbi Jim (Korean beef rib stew) and stewed apples. It's in its box most of the time. The first step is to get the funkiest, nastiest, most pungent onions you can find. I made a mistake here, asking someone to buy them for me, because I got 6 mild-ish white onions instead. They didn't even make me cry when I cut them into half-wedges.

I tossed them with a half-stick (4 tablespoons) of unsalted butter and an uncertain quantity of olive oil (about 1/4 cup). I didn't season it yet. If you followed the link above, they recommended the addition of demiglace, which is a thick brown sauce made from veal stock. There is no way I could procure this, so I decided to skip it. Anyway, I decided to season it later. Looking back, I could have added a beef boullion cube or two to amp up my weak onions. I placed the slow cooker on HIGH setting with a cover on, because the smell is a bit strong while it's starting to cook. This is what it looked like after 3 hours:

After a while the smell became tolerable to the rest of the household and I necessarily had to take the cover off for the liquid to reduce to almost nothingness. This is what it looked like after 6 hours:

The flash was on as it was getting dark. All in all, I had it cooking on HIGH for a total of 14 hours. At around the 12 hour mark I added salt to taste and black pepper. When it was done, there was still quite a bit of oily liquid left, which I discarded, getting the limp brown remains of the onions. Tasting it now I realize it's not sweet enough (due to my onion selection) and not salty enough (due to my timid seasoning). Next time: funky onions, beef cubes and salt.

Anyway, 6 large white onions reduced into a little more than half a cup. I had it on toast. Not bad, but it's missing flavor. Definitely for onion lovers. It was kind of neat eating basically a whole onion on a small slice of bread.

25 July 2007

Simpson-ize Me

I still haven't seen the Transformers movie, despite everyone and their mother telling me how great it is. However, I will NOT allow the rest of the world to take advantage of me since the Simpsons movie is opening here a good 2.5 days ahead of the States. Yay. I still haven't seen it, though, and it's been showing for a day already. I may have to do something about that...

This is a Simpsons avatar I got from the official website. And that is the closest I can get to what I look like. I had to tweak it in Photoshop so my eyes had dark circles under them.

Roasted Pork Loin in Beer

(Gebratene Schweinelende im Bier) My mom was feeling ambitious, so for a recent party she held, she bought 2 boneless pork loin roasts that weighed 3.75kg (8.25lbs) and wanted me to roast one-- with only 24 hours notice, including cooking time. By the way, I was also preparing lasagnas and dessert. Realizing I couldn't stuff the monster (she wanted me to do a simple roast), I knew I had to brine it to keep the loin moist and tender while the whole thing roasted for nearly 3 hours. But what would the flavor of the brine be? I turned to a German method: in beer. To each gallon of beer, you would have to add a cup (300g) of salt. I only needed a liter of beer, I just used 1/4 cup. The rest of the ingredients are: 1/3 cup mustard, 1 chopped onion, and 1/4 cup honey. (Rest of the instructions follows)
Roasted Pork Loin in Beer
I needed to brine it for at least 2 days given its weight (4 days to be exact), but I only got to soak it for 12 hours, so the flavor didn't fully permeate the meat (the center was decidedly porky), but the crust was quite flavorful (you could really taste the beer). After the soak, I pat it dry and crushed a handful of black peppercorns, salt, cumin, and cinnamon in a mortar and pestle, and rubbed it all over the roast. It was in a 170°C (about 335°F) oven for 3 hours, which is about the time that the center reached 160°F (I've just recently read that the center could be 140°F and you've already killed bacteria and Trichina).

From the roasting pan, discard the fat (NOOOO!) and pour in 3 cups of cranberry juice. Scrape up the brown bits and strain into a saucepan. Add salt to taste and bring to a boil. Add red wine vinegar to taste, then add a slurry of cornstarch and water to thicken. Serve with the sliced roast.

Unfortunately, I had to scoot for the party. My mom didn't do a very good job carving the roast, so the slices were too thick, magnifying the fact that the flavor hadn't yet permeated the center. D'oh! Maybe I should have masqueraded as a chef around the party in my white uniform?

22 July 2007

Pre-Life Crisis

28 May 2008 Update: The UK dream is on the back burner these days. Because at that time I didn't fully understand the Foundation Program. Also, I've already been to the States and my (admittedly frightened) opinion of it has changed.

I now interrupt the steady flow of food from my table for a rant/ call for advice. I know usually the answer to such questions about what to do with the rest of your life is "Do what you want! Follow your heart!" But I guess I wanted to really hear it from somebody or maybe somebody has some other advice to offer.

I don't know where I should continue practicing medicine.
My friends who've listened to me know I initially wanted to practice in the UK. Despite the fact that I'll be essentially a government employee and I'll be whisked away to a place where I don't have any relatives to live with and the cost of living is so high, it's still a dream-- THE dream of mine. The land is nice, the people are nice, the corresponding salary should be okay, and I get to live somewhere I find interesting and a gateway to other places I absolutely love. Do hospitals have living quarters for their employees? Well, regardless of whether I do that or live in a boarding house (I think that's the best my family can afford till I actually earn enough to live on my own-- if we can afford to send me to the UK at all), I still probably wouldn't have an oven to play with.

The other popular choice for doctors who aren't staying is to go to the States. The cost of the exam is prohibitive (let's not even talk about being accepted), but I have a few relatives living here and there, not that they live anywhere where I would want to work. I've never been to the States but I'm not terribly interested, plus I shudder at the thought of being a victim of a well-thriving culture of racism. Some people may think I'm being paranoid but for a short(-ish) Asian guy, the fear is real. The cost of living is still expensive, though not as expensive as the UK. Maybe my family can afford that, but I do feel guilty about using up so much of our resources.

The third option is to stay here. The Philippine General Hospital is a great training hospital and you would be able to see cases most doctors aren't fortunate enough to deal with. But-- I don't want to go there anymore. No offense to the people who work there and to the people who want to serve the underserved, but I feel trapped and suffocated there. The plus side of being here is that everything is convenient-- I still have my own house, my family would be a stone's throw away, I could probably rent a decent apartment, I can cook whatever and whenever I want, and I wouldn't ever have to worry about the cost of living or freezing my ass off in some foreign land because I don't know how to work the gas. But it's more of the same. I'm not sure I can take more of the helplessness and boredom. Cooking and talking with my international friends is great, but it only leaves me wanting more adventure.

I've thought about working here for a while and saving money, but getting P13,000 ($290 or £130) a month-- minus the costs of being a doctor to people with no insurance and the cost of living-- might not get me far once I'm done. Plus, I'm not getting any younger. Yes, all this at the tender age of 25.

My friends are all busy, like me, studying for the licensure exams, so I couldn't bother them with my major life decisions. I just thought I'd feel better writing them down.

Sorry to be such a downer. Anyway, Stay tuned for more food, plus (crossing my fingers) a major dessert-o-rama in August.

21 July 2007

Mango Pudding

I needed to find a way to use up my mangoes. The first thing that came to my mind was mango pudding, because it only takes 30 minutes of active time. After I'd seen this excellent picture on the internet, I knew I had to do it. I did some research on the dessert, and it turns out it's a Hong Kong creation, and you know how I love to name my desserts in the language from where they originated. No dice. Mango pudding in Hanyu Pinyin is mang guo bu dian (I didn't copy the actual characters so as not to put most people's browsers on the fritz), which if you say it out loud, is evident in its meaning. No depth. But the dessert itself is quite a treat despite its simplicity. (Recipe follows)
Mango Pudding
I originally wanted to add small sago (tapioca) pearls to the pudding for interest (visually) and chewiness, but I thought it might mar the smooth surface, plus cooking it involves 15 minutes of boiling with constant stirring and cooling for a long time. So now I have a bag of sago I don't know what to do with (maybe make sago and gulaman [agar-agar]? So, no pearl necklace for my dessert.

All the recipes I've looked over the internet are pretty much the same, but I simplified the process, and also avoided boiling water so as not to denature the gelatin. Sprinkle 2 packets of gelatin (about 2 tablespoons) into a mixture of 180mL (3/4 cup) water and 150mL (2/3 cup) evaporated milk at room temperature in a medium-size microwave-safe bowl and set aside to bloom. Scoop out the flesh of 2 mangoes (weighing a total of 700-1000g, pits and all) into a blender with 240mL (1 cup) of mango juice or mango nectar. Purée for a minute or until lump-free. By this time the particles of gelatin will have swelled. Stir the milk-gelatin liquid gently to distribute then microwave on HIGH for 45 seconds, avoiding boiling the mixture. Stir the liquid until it appears homogenous and the gelatin is dissolved. Strain using a fine sieve into a bowl with a spout to remove any remaining lumps. With the sieve still over the bowl, dump the purée through it into the bowl to remove any unprocessed mango fibers (push the purée with the back of a spoon if it moves through the sieve sluggishly). Stir thoroughly. Taste the mixture; it will probably taste dilute, so you may add superfine sugar (I just used regular granulated sugar, since the ambient temperature was 33°C) to taste. I was able to add 1/4 cup of sugar without making the mixture cloyingly sweet. Pour or ladle the mixture into individual ramekins or dessert cups and leave to set in the back of the refrigerator for at least 2 hours or until it no longer jiggles in the middle.

You may want to use low-fat milk as a substitute for evaporated milk, if you want the dessert a bit healthier and less rich, and more fruity.

Garnish as you wish. I used maraschino cherry halves carved into hearts so I can show off the smooth surface of the pudding (I considered using a fan of mango slices also). I also dropped a whole cherry into the bottom of some cups, but I found the pudding was too opaque to really show it off.

20 July 2007

Foccacia (with how-to)

Undaunted by my whole one-hour kneading experience before, I rushed headlong into my next bread-making experience, this time with Foccacia, which means "focus," referring to the hearth in which the bread is baked. It's a relatively flat Italian bread, and always the one I scoop out of the bread basket in Italianni's instead of the Ciabatta, and perfect with olive oil and balsamic vinegar, but also for other uses like Paninis and such. I used Dan Lepard's recipe and his method... But I still don't have a heavy-duty mixer. By the way, I got the bread flour, which is not available in any of the major groceries, from the neighborhood (sari-sari)store. They don't bake their own bread, but I struck a deal with them and they asked their supplier to give them a few kilos of bread flour, which I got for PhP40 ($1) a kilo. I'm pretty sure they've already stacked on their profit, but that's still a good deal for me. (Instructions follow)
Foccacia
The recipe is, without breaking copyright law again, 1kg of strong white flour, with 68% bottled spring water (I used Viva), 2% salt, 0.7% dry yeast, 1 tbsp olive oil, and 1 tsp sugar. Make the starter by combining the yeast, water (I no longer warmed it as it is 33°C here today), and half the flour. Wait until it rises by about one-third and is clearly active (has a lot of bubbles). I realized that the recommended times for rising and such vary tremendously between here and the United Kingdom where the book was published, so from today's experience I now use 1/4 the recommended time. So when they say about 2 hours for the starter to become active, I only waited 30 minutes.

Make a well in the remaining flour and add the starter and the rest of the ingredients, then mix with a strong wooden spoon.

Here's where I digress from the original recipe due to my lack of a mixer: dump the dough onto your working surface and knead until it becomes elastic and a finger's identation will spring back. This time, it took me about ten minutes.


Form into a ball, place in an olive-oiled bowl, and brush the surface with olive oil. Cover with a towel and leave to proof for 30 more minutes in our hot weather (so that's 2 hours in non-equatorial weather), until a finger's indentation will slowly spring back.

Form into a rough rectangle, then fold into thirds and then into half in the other direction.


Cut in half and shape each into a 20x30cm rectangle and fit into a floured sheet pan. Cover with a towel and leave to proof again for 15 minutes in hot weather. Dimple the surface 1cm deep with your fingers and drizzle the top with olive oil, and sprinkle with coarse salt.

Bake in a preheated 250°C (482°F) oven for 10 minutes, then lower the temperature to 200°C (398°F) and bake for 20 minutes more.

Lesson learned:
The dough is supposed to be a little sticky. Don't be afraid to add water (by moistening your hands if needed).

18 July 2007

La Pinay (with how-to)

(Crêpes au Chocolat avec des Mangues et le Nutella) The days are done when Café Breton was the only crêperie around: small, trendier, and less quaint shops have sprung in Power Plant, Shangri-La, and other malls. Is this a move towards the Philippines having a crêpe stand every block, like in Paris? Of course not. When you talk about a crêpe in the Philippines, those other shops don't come to mind, it's still Café Breton. They may not have "advanced" fillings like "Crème Brulée" but each of their offerings has a personality, no matter how simple their construction. The quintessential Filipino crêpe is their creation and the most famous one on the menu-- La Pinay, literally translated to "The Filipina (woman)." I wanted to make one, but it would be useless to make something that's P126 (about $3) unless I added a unique touch. So I thought, let's not give the tongue a break. My version will be mangoes on chocolate on chocolate with mangoes on mangoes, meaning this one is a CHOCOLATE crêpe filled with mangoes, slathered with Nutella, on a bed of mango slices, with Mango ice cream on top. Not many people in other countries are going to think the combination of chocolate and mango is intuitive, but in a tropical country like ours, you make do with what you have, and if what you have is decadent tropical heaven, then hey, you didn't do too bad. (Instructions follow)
La Pinay (Chocolate Crepes with Mangoes and Nutella)
I've made crêpes a few times before but it's only now that I developed a foolproof way of making them. My previous attempts were either thick or torn. (By the way, my choice of filling in the past? Stewed apples.)
Begin with all your instruments. I have a nylon spatula and a nonstick frying pan. You don't even need a crêpe rake (the wooden thingy above). Without breaking any copyright laws, the batter is 2/3 cup all-purpose flour, 1 1/2 tbsp sugar, 3 1/2 tbsp Valrhona cocoa, 2 eggs, 1 cup milk, 3 tbsp beer (I used San Mig Light), and 2 tbsp melted butter. Mix the dry together, whisk the wet together, then combine and refrigerate overnight. Easy. This crêpe recipe is from Chocolate Desserts by Pierre Hermé, by the way. Make sure the batter has no large bubbles by banging the bowl against the counter. Ideally this is in a pitcher or, in my case, a bowl with a spout.

Grease your nonstick or crêpe pan. I used Pam baking spray and spread it with a small bit of a paper towel. I do this before each crêpe to make sure that there are no cooked bits stuck to the pan, because that becomes a point of non-nonstickiness, which means a potential tear. Over medium-high heat, heat up your pan. Take it off the heat and pour in a good amount of batter-- we're talking 80% surface coverage or more-- then swirl the pan around to make as layer as thin as possible, then pour the batter back in the bowl to keep the layer thin. It will set in a matter of seconds.

It's important to pour a lot in because if there's not enough batter to complete a clean circle, there will be holes, and holes mean a potential tear when flipping the crêpe, like this:

This wasn't in the recipe, but here's how I did mine: I turned the heat back to low, then placed the pan to further cook the crêpe. Cut the tail off from pouring the batter and discard it. Notice that the surface is lifted by coalescing bubbles on the underside. This helps towards making sure the crêpe is totally free of the pan.


I turned off the heat to make the next step easier, because I am a wimp. Ideally, you can flip the crêpe while it's still hot to save time, but I wanted perfect crêpes, so I waited until it was cool enough (but not cold, mind you) to handle with my bare hands. Take a strong edge (probably the edge from where you cut the tail off) and loosen the whole crêpe free of the pan, then flip it. This whole time, the heat is off.

I obviously didn't use just one hand, but the other hand was taking a picture. It's important to use both hands to reduce the pressure on the crêpe. If you use a tool like the spatula for example, it maximizes the pressure on a point on the edge of the spatula, tearing the crêpe, like so:

Almost done! Over low heat, cook the other side for a few seconds (it's already set anyway) to ensure thorough cooking. I used coalescing bubbles as a hint again, but really this is just to make sure no one is eating something batter-y.

Stack them in between wax paper, or in my case, foil. Not the most environmentally sound solution, but when the crêpes are cool, they will stick to each other and you will kill yourself if you don't do this.

This isn't really that hard, but it does take a lot of patience, wiping down the pan in between each crêpe, and waiting for each crêpe to set and cool before flipping. But once you've mastered it, you may just be one of those people setting up their own crêpe stand (just always offer Nutella, please). Meanwhile, remember what they always say: the first crêpe you make is always a dud.

17 July 2007

Filipino Banana Split with Banana Fritters

What is a Banana Split in Filipino? Biniyak na Saging na may Sorbetes? After Pierre Hermé and Dorie Greenspan gave a French character to the banana split, I thought, why not do the same for my own nationality? Now, without seriously racking my brain, bananas served as dessert in the Philippines come in four ways: minatamis na saging or sweetened bananas, which are starchy bananas cooked in brown sugar and water till it's thick and the bananas melt in your mouth; fried bananas, which are self-explanatory but kind of a no-brainer; Turon, which are spring roll wrappers filled with bananas, fried, and glazed with caramel; and Maruya, which are banana fritters. I decided to go with the fourth option because even though caramelized bananas are definitely the way to go, it's much too similar to my previous banana split endeavor. (Details follow)
Filipino Banana Split
The fritters are simple enough to make-- one egg with a few tablespoons of flour, a tablespoon of milk, and a pinch of baking soda, then deep-fried till golden, then dusted with powdered sugar. My main problem with this concoction is the banana itself. Following tradition, I used saba bananas, which are a little like plantains in that they are very starchy. Frying them didn't give me enough sweetness, and I was disappointed; I should have gone my own way and used a respectable regular banana. On top is mango ice cream (our national fruit!), chocolate sauce (hey, we were colonized by Spaniards, it counts), and just to humor myself, whipped cream and a cherry. I would have topped it with crushed pineapple instead of chocolate but I didn't have any available; in retrospect I would have appreciated the analogous tropical fruity flavors more.

Other Filipino topping considerations:
1. Pinipig - roasted immature rice, similar to Rice Krispies
2. Macapuno - coconut sport
3. Kaong (sugar palm)
4. Sweet kidney beans
5. Ube (purple yam)
6. Langka (jackfruit)
7. Leche Flan (crème caramel)
8. Garbanzos (chickpeas)
Really, I'm just naming the contents of Halo-halo.

16 July 2007

Parker House Rolls (with how-I)

Being on an international forum like the eGullet forums can really mess you up. You get all sorts of ideas in your head about things you've never done before, and things you've never eaten, and how actually making them can satisfy both hungers-- for experience and for taste. The problem is, my skill set is limited. So I thought before I venture into the land of bread-baking, I might start with something not too equipment-intensive, and with a taste I actually crave for-- Dinner Rolls. As a kid I saw a recipe for Parker House Rolls in the Betty Crocker Encyclopedia of Cooking (ca. 1960), which is really a shape "invented" by the folks at the Parker House Hotel in Boston, Massachusetts. (Recipe can be found here). Note I called this a "How-I", not a "How-to", because I'd recommend a heavy-duty mixer, not what I did here. Oh, and bread-making know-how. But I'm getting there.
Parker House Rolls
Here's where it starts. All your ingredients and materials, ready for use.

Here's the initial mix: 2 1/4 cup of flour, a stick of unsalted butter, 4 1/2 tsp instant yeast, 2 tsp salt, 1/2 cup sugar. I blended it with my hands, because it's very dry and my hand mixer won't be able to handle it.


Add in 2 cups of hot tap water (60°C) gradually. In retrospect, since humidity is high in this country, I should have added much less. It'll turn into a runny batter, so the whisk is okay for use after a while.

Stir in the rest of the 6 cups of flour (minus 1/2 cup) with a strong spoon.

Plop it onto a lightly floured surface and start kneading, incorporating 1/2 cup of flour in the process. The prescribed time is 10 minutes, but due to the excess water, softness of flour (all-purpose flour has less protein than bread flour, so gluten development leaves a lot to be desired), I KNEADED IT BY HAND FOR AN HOUR. Lesson: buy a heavy-duty mixer. I needed the exercise, so I think I'll keep doing this.


By the way, I didn't just use one hand. The other was taking a picture. But I was really mean to the dough, abusing it. After an hour, it kind of passed the "window test" (you should be able to stretch it thin), I said "fuck it, I'm so tired."

Turn it into a ball by stretching the surface towards the underside and place upside-down in an oiled bowl. Leave it alone to proof. After you've let it double, 2 fingers should leave a depression. This happened in half the prescribed time, but a slow rise is actually preferred, so minus points for our climate (despite the fact that yeast multiplies better here).

Deflate carefully by bringing the edges to the center while pushing it gently down, then knead it for a while till it comes to a smooth ball, then cover with the bowl and rest again for 15 minutes. It'll rise again.

Roll it out on the floured surface into half an inch thickness, then use a floured 2 3/4 inch cutter to cut out circles. Unfortunately, the dough was still rising even while I was cutting it, so it didn't stay half an inch for long. Not good if you want a nice, recognizable Parker House shape.

Dip it in the melted butter in the roasting pan and lay them out in rows, then bake in a preheated 205°C (400°F) oven for 17 minutes. I baked mine for a little longer (around 20 minutes) but they're still pale.

If you notice, the bottoms are still quite greasy. There was too much butter left over at the bottom of the pan. I'm not the type to slather butter over rolls, so I didn't appreciate this, not to mention it made them a little soggy at the bottom, which I'm not a fan of either.

13 July 2007

French Banana Split with Flambéed Bananas (with how-to)

Not surprisingly, Banana Split in French is still Banana Split. I implore any French readers to come up with the official translation. For now, I'll call it Coupe Bananes Français avec Bananes Flambée. I got the idea from Chocolate Desserts by Pierre Hermé (again), but I thought I'd put my own twist on it, plus I get to try something I've never done before-- that is, to flambée something. In any case, the toppings are rum raisins, chocolate sauce, whipped cream, and a maraschino cherry.
French Banana Split
I'm a big fan of saving dishes so we don't have to wash so much, so I made the rum raisins in the microwave. In a small ceramic bowl, I combined a few raisins, and 1 part rum (I got Tanduay White) to 1 part water. Heat it for 2 minutes over low power, then let macerate for at least two hours.

I've never witnessed a flambée before, except this one time when they had the sauce (I think it was Mango Jubilee at Mario's?) in a gravy boat, and they ignited it in the boat. Which was nice to see, I guess, but without much instruction, I still wanted to try it myself.

Again, put together your mise en place. You'll notice that there is a lid nearby, and that is to put out any overzealous flame. Of course, during cooking, the bottle of rum is not that near to the flame. Ahem. Anyway, melt the butter over high heat, and when sizzling, add the split banana and sprinkle with sugar.

You do want a nice caramel color, but you don't want to cook it too long as the line to mush is a thin one. And I think I crossed it. Anyway, don't be shy with the flame and it will be over in a matter of seconds.

The classic way to set your flambée alight is by tilting the pan so the liquid touches the high flame. I wasn't about to do this since I could easily spill the contents in my clumsiness, and instant grease fire. I played it safe and used a cheap igniter. So, once I take the bananas off the heat, I splash the rum in, and light it up.

Do you see the flame at the 11-12 o'clock position? I barely can. If you're scared that you might cause an inferno doing this, it will delight you to know that the flame was quite impotent and wimpy, and would no doubt give its lunch money to Mr. Hand-Pulled Noodles and Mr. Puff Pastry without a fight. I however still have my Y chromosome (last time I checked, ha ha) and I was pretty pissed that the flame didn't consume my dish. Oh well! Thank heavens for small favors.

It turns out, I'm not a big fan of rum raisins. Live and learn!

Ham and Mozzarella Sandwich with Caramelized Onions and Pineapple Glaze, and Onion Rings

Longest blog title ever! It is exactly as I said, plus curly leaf lettuce. It was just a simple matter of cooking a small quantity of onion rings in olive oil over low heat till they are homogenously dark amber or brown. Then, place the (apologetically boring) white bread with some shredded mozzarella on one on the oven toaster till they get nice grill marks on the bottom. Add some brown sugar to a single serving of pineapple juice with a pinch of cornstarch and simmer until reduced and very thick. And then you have a ham sandwich that no one can accuse of being boring. (Onion Rings instructions follows)
Ham and Mozzarella Sandwich with Caramelized Onions and Pineapple Glaze
The onion rings are some of the best I've ever tasted, and are very easy to make. Just mix together 1/3 cup of milk, 1 egg, and a pinch of salt and black pepper. Slice 2 large white onions into rings and soak for 30 minutes in the egg mixture. Break open some pancake mix (I used Maya) and pour about 100g onto a plate. Dip each onion ring into the breading (you don't have to worry too much about excess breading) and deep fry in hot oil until golden brown. Drain on paper towels. Load the onion rings into a loaf pan, forming a very loosely packed loaf, and bake in a preheated 205°C (400°F) oven for 10-15 minutes. I ate mine with barbecue sauce. YUM!

11 July 2007

Sha-Do Lamps: Awesome Design Alert

I was doing my usual rounds browsing the net when I came across this entry on NOTCOT.org featuring Shadow lamps from a German company. I absolutely fell in love and I will not rest till I get one, or acquire sufficient skill to make one. As if.

Shown here is the "Brüssel" design (there are a lot of interesting ones: Bombay, Paris, Washington, "Tokio", and Versailles, among others. I realize that I haven't yet written about my wonderful adventures in Brussels but this lamp is JUST SO FREAKING ELOQUENT! I WANT ONE! NOW! AND IT COSTS €299. That's PhP19,000. Or £200. Or $410. Maybe by the time I'm a successful doctor I can find one in a dumpster.

10 July 2007

Schwarzwälder Kirschtorte

(Black Forest Cherry Cake) My aunt/godmother came in from Canada, and she's an excellent baker, so my mom asked me to make something to show off. I didn't want to repeat, so I made the classic Black Forest cake, based on the Chocolate Rhapsody recipe of Flo Braker (in The Simple Art of Perfect Baking). As you can see, I went all-out with the adornments on this one. I would have made chocolate cigarettes and a how-to but I was too stressed out! Plus, the photo shoot for this one left a lot to be desired. But, I love its octagonal configuration and its unashamed chocolateness. That's chocolate mousse in between two layers of chocolate butter cake with chocolate glaze and chocolate garnishes. Thank God for whipped cream (and cherry syrup and chopped cherries). Even if the cake is ubiquitous in shops, you get a feeling you're eating something new.
Schwarzwälder Kirschtorte 2
Schwarzwälder Kirschtorte 1
It was the biggest mess I've ever made in the kitchen. That mousse would not stay firm for more than a few minutes (the climate, y'know... next time: gelatin?), and the top layer actually broke into three while I was flipping it because I'm hard-headed and I wanted to use a chocolate butter cake whose time had come instead of a reasonable genoise/ sponge (next time: genoise). I cemented it together with extra chocolate mousse. I hope I hid it well. It says "Gateau Schwarzwälder" on top for no good reason except to misguidedly mash two languages together (next time: er, nothing). The stars on top have crazy bloom on them, so they're all different colors (next time: stick to cherries?).