Showing posts with label spoon dessert. Show all posts

24 November 2009

Tartine's Chocolate Pots de Crème

Chocolate Pots de Crème
So, like I said in my previous posts, this is my first Thanksgiving. However, I'm not feeling the mad rush to produce dinner, since my uncle's dad has already volunteered to do so, which is a relief (though I am thinking about dessert, I hope he doesn't mind). It will also be my first Black Friday, or the day after Thanksgiving that, as I understand it, there's usually no work and stores slash their prices to encourage buying for the next big holiday. There've been horror stories about this, sadly, but I'm avoiding that rush too and thankfully there's the task of babysitting my cousins while my aunt and uncle go to work (no surprise there, as she works in Nordstrom).

16 August 2009

Dulce de Leche Flan

Dulce de Leche Flan (with title)
When I was in college, there used to be this strange yearly event for freshman orientation wherein various organizations compete to be the best. At what, I don't know, because it involved racking up points for 1) collecting as much newspaper as you can and 2) hanging out at a particular building in campus during your spare time for the most amount of hours. It was considered to be a chore because let's face it, there's a ton of places better to go than some ratty building wherein you played board games until everyone went postal from having to hang out with each other (er, never happened).

12 November 2008

Almond Tofu and Fresh Fruit Cocktail

Almond Tofu and Fresh Fruit Cocktail (white, with title)
I am currently in the midst of one of those thoroughly enjoyable e-mail conversations that, thanks to the magic of GMail, is smartly compressed into a single space in my inbox instead of filling up pages of Re: Re: ad nauseam. My friend Duncan asked me if I suffered from "a question-started-must-answer-fully-OCD type of thing, or an irrepressible-helper-syndrome-OCD type thing." Which I'm not sure are really things, but leave it to him to make up the names :) The truth is, I don't consider it very much of a big deal to answer some of the day-to-day questions and favors I encounter, and usually gratitude is forthcoming. Rarely it isn't, and if they're strangers I quickly file those people under "dead to me."
Origami Anemone Flower
I have to admit, though, that people (me included) usually sneer at the "people pleaser" which is the actual thing you might call me, probably because it can be so easily equated with negative things like "doormat," "kiss-ass," "ass-whipped," "spineless," etc. If you'll excuse me for going unnecessarily (?) on the defensive, I have a spine, thank you very much. Maybe I just want others to keep believing that there are still good samaritans out there, though I will say that the things I usually do for other people are nowhere in the league of some amazingly kind souls out there. Anyway, it reminds me of that episode of Ed where he was sued for breaking a man's thumb while he was pulling him out of a burning car. In Ed's defense, his counsel Frankie said that if they punished him for stopping to commit an act of kindness, he might "stop stopping."

What does this have to do with almond tofu, or the Beatles? Nothing at all. In any case, most food bloggers don't come up short in the generosity and gratitude departments anyway, I just wanted to put my thoughts out there (again). Here's hoping that those kind souls out there never stop stopping to help.
Almond Tofu and Fresh Fruit Cocktail (red, with title)
Experimenting with another background. Even if the white one was easier to do, I still liked it better.
The sad fact is, though, that I am really one of those people who can't sleep when he's not in good terms with someone, unless they have joined said "dead to me" list. Oh well, I hope that doesn't detract from my message, heh :)

When Graeme told me he was thinking of photographing Origami figures for his project, it reminded me of a few models I was hoping to finish, and maybe photograph myself. The one above is an Anemone flower-- I have a few more, but I'm saving them for a future post.

I also decided to compile all the digital piano recordings I was making onto a single auxiliary site. Click here to access my music files. The newest ones are Carole King's "Home Again" and The Beatles' "For You Blue" (written by George Harrison for the Let It Be album). I'm particularly proud of "Home Again" because just yesterday I heard it while relistening to my Tapestry album when I thought it sounded nice and a little appropriate for the upcoming chapters of my life. So today I listened to it while deciphering it by ear to the piano. I'm not advanced yet to pick up the bluesy improvisations of King or Harrison but it's not bad for a few minutes' work, I think. I am also quite proud of myself for figuring out how to make an RSS feed for the music site using Feed43.com-- that was a lot of fun.

I made this a few weeks back, and it was a really good, light dessert. I might use the almond tofu base for something else in the near future. It's from The Sweet Spot, which was given to me by my irrepressible friend Allen. I wish I'd used a real peach or pineapple instead of a nectarine-- I found the nectarine too soft and sweet, when I was looking for something a little more acidic.

EDIT: The name "Tofu" is a misnomer (Pichet Ong said as much)-- this dessert contains no soybean mass, only the gelled soymilk, or tau-hu. Sorry for the confusion!

Almond Tofu and Fresh Fruit Cocktail adapted from The Sweet Spot by Pichet Ong
For a dairy-free version of this dessert, use almond milk in place of the milk, or soy milk throughout. In the wintertime, kiwi fruit or pineapple may be a more acceptable substitute for stone fruit (peaches). You may also use an appropriate substitution of agar (for 3 cups liquid) in place of the gelatin if you want this to be a vegan dessert.

  • 335g (1-1/2 cups) milk (can use whole, 2%, or skim milk, or almond milk)

  • 1 tablespoon powdered gelatin

  • 335g (1-1/2 cups) unsweetened, unflavored soy milk

  • 100g (1/2 cup) sugar

  • 1 teaspoon almond extract

  • 1/8 teaspoon salt

In a medium bowl, Sprinkle the gelatin over the milk and set aside for 10 minutes. Put the soy milk, sugar, and salt in a large saucepan and place over medium-high heat, stirring until the sugar is dissolved and bubbles form on the edges of the pan. Remove from heat and stir in the milk-gelatin mixture until completely dissolved. Divide between 8 serving bowls or glasses and refrigerate until set, about 3 hours. You may refrigerate them at an angle using an egg carton or rack, securing the glasses so they don't tip over.
  • 210g (1 cup + 2 tablespoons) sugar

  • 240g (1 cup) water

  • 1/4 Asian pear, cut into 1/4-inch dice

  • 8 4-inch long strips orange zest

  • 16 seedless red grapes, cut crosswise into 1/4-inch slices (thinner if you can manage)

  • 2 small peaches, pitted and cut into 1/4-inch wedges

In a small saucepan over medium heat, bring the sugar and water to a boil, stirring constantly, until the syrup is clear, about 2 minutes. Remove from heat and add the pear and orange zest. Cool to room temperature. Add the grapes and peaches, then refrigerate until ready to serve. Divide among the serving bowls.

P.S. Jeanne, I will get to the meme someday. This post was just too long already, hee hee :)

02 November 2008

Trio of Chocolate Mousse Cake

Les Trois Soeurs
Trio of Chocolate Mousse Cake (with title)
I've noticed that it's become kind of tense lately and I'm somewhat contributing to the problem, if you can call it that. Factor in my usual tendency to overshare (which has gotten me screwed before, dunno why I never learn), and you've got kind of nervous/icked-out readers. Sorry about that. The last two weeks have not been typical in the slightest. As proof of that, I just gained 3 pounds over my average in the span of a week. Damn you, chocolate!!

Actually, I'm glad I'm shaking it off because I was originally going to talk about sex based on my association of it with chocolate. Really dodged a bullet there! (Believe me, you don't want to hear me talking about that-- though I have one friend who says she gets the tingles when she hears me say the F-bomb.) Instead, I'm going to have Kylie sing about it in a very beautiful French-style music video for "Chocolate." Thanks, Kylie.

Trio of Chocolate Mousse Cake (slice)
Those of you who skip straight to the funnies in the papers probably know of the existence of the comic strip Cathy. It's quite a polarizing strip, in that it's kind of the chick flick of the comic strip world. Currently there seems to be a series of strips where Cathy makes the connection between tough times and eating.

Art imitating art; Liz Lemon plagiarizing Cathy.
While I don't necessarily have any cravings, I find that I have a (fatal) mouth-stomach disconnect wherein I compulsively eat food just because it's there, even if I'm not really hungry. Last night I told my dad I could barely eat and dragged my feet into the dining room, only to be stuffing myself later with leftover jambalaya, fried spring rolls, pancit (stir-fried noodles), peas, corn, and carrots, grape juice, and finishing it off with a huge sweet roll stuffed with cream cheese. I have no idea where that "hunger" came from, but at least I know what the hell to stop doing so I don't explode.

By the way, what would you consider proper comfort food? I hope to fall on the side of Irving someday-- yum, fresh apple.

My body seems to be telling me to slow down in other ways: I was working on raw chocolate for another dessert a few days ago and I ate the scraps so they wouldn't go to "waste." For some reason the caffeine, tyramine, or whatever food cooties reared their ugly heads and gave me a headache. I suppose I should be thankful for small favors. But really, the best way to avoid these pitfalls especially this holiday season is to plan ahead, make only as much as you need, and of course, share it with others!

Case in point: I made this scaled-down version of a cake (that originally serves 12, and too generously in my opinion) from famed New York patissier Francois Payard, and served it to Genie, Vany, and Genie's mom after they helped me in preparing for my exam. Not only does it look elegant in my opinion, but I was also quite impressed on how distinct the flavors of the chocolates are in each layer. Despite the long instructions, it's really not that hard to make when you have the ingredients all ready. Now all that needs to be done is to get rid of the three pounds...

Trio of Chocolate Mousse Cake adapted from Chocolate Epiphany by Francois Payard
This is more accurately a bavarois cake. For this recipe you'll need a 6" cake ring 2.5" high, or a cake pan of the same dimensions, but it's easy to make it in a 9" cake ring, springform, or cake pan: simply double the quantities listed here. If using a cake ring, a strip of acetate at least 2.5" wide and at least 19" long is recommended to make a clean side. If you don't have acetate, just freeze the cake for longer and unmold when very firm. It will be difficult to add the cocoa mirror glaze if using a cake pan without destroying the pristine sides, but you can build the layers any order you want, and decorate some other way, such as with white/dark chocolate shavings or peaks of whipped cream.

Creme Anglaise Base

  • 120g (1/2 cup) whole milk

  • 2 large egg yolks

  • 15g (1-1/2 tablespoons) sugar

  • 25g (1-1/2 tablespoons) light corn syrup

In a small saucepan over medium heat, bring the milk to a boil. In a separate small bowl, whisk the egg yolks, sugar, and corn syrup. Slowly pour the milk into the yolks in a thin stream while whisking madly. Return the mixture to the saucepan and reduce the heat to low. Stir constantly with a wooden spoon until it is thick enough to coat the back of the spoon and leave a trail when you run your finger through it (it will take a little more than a minute). Remove from heat and strain into a bowl. You will need the creme anglaise to be hot enough to melt the chocolate in the next step, so work quickly.

Chocolate Mousses
  • 55g (1-3/4 oz) white chocolate, chopped

  • 55g (1-3/4 oz) milk chocolate, chopped

  • 63g (2 oz) 72% chocolate, chopped

  • 375g (1-1/2 cup plus 1 tablespoon) heavy cream, chilled

  • and for each chocolate mousse:
  • 1/2 teaspoon powdered unflavored gelatin

  • 15g (1 tablespoon) cold water

Prepare 3 medium bowls each containing one type of chocolate and 3 small cups, one for each type of chocolate. Sprinkle the gelatin over the water and let stand for 2 minutes. Microwave on low power for 15 seconds, or until the gelatin is fully dissolved. Dump 1/4 cup (60g) of the hot creme anglaise over each type of chocolate and give each a gentle stir to melt the chocolate. Stir in the dissolved gelatin into each chocolate sauce and stir until well-combined. Set aside.

In a well-chilled bowl and using well-chilled beaters, whip the cream until it holds medium peaks, about 5 minutes. When not using the whipped cream, keep it in the fridge.

Line the sides of a 6" cake ring with acetate and place on a piece of plastic wrap large enough to cover the bottom of the ring on a rimless baking sheet or removable bottom of a tart pan. If using a cake pan, spray with vegetable cooking spray and line with a large piece of plastic wrap, pressing it against the sides.

Take a third of the whipped cream (125g) and fold it into the dark chocolate sauce until well-combined. Pour it into the center of the ring and give it a gentle bang to level the mousse. Place in the freezer for about 20 minutes or until halfway firm. Take half of the remaining whipped cream (125g) and fold it into the milk chocolate sauce until well-combined. Pour it into the center of the firm dark chocolate mousse and give it a gentle bang to level the mousse. Return to the freezer for 20 more minutes. Fold the white chocolate sauce into the remaining whipped cream until well-combined. Pour it into the center of the firm milk chocolate mousse, taking care to leave a few mm space to pour in the cocoa glaze (eat the remaining white chocolate mousse if there is any as a treat). Leave in the freezer overnight, or until completely firm.

Cocoa Mirror Glaze
  • 60g (1/4 cup) whole milk or heavy cream

  • 75g (5 tablespoons) water

  • 90g (7 tablespoons plus 1/2 teaspoon) granulated sugar

  • 33g (5 tablespoons plus 1/2 teaspoon) Dutch-processed cocoa powder, preferably Valrhona

  • 3g (1/2 packet) gelatin granules

  • 15g (1 tablespoons) water

Prepare the glaze according to the instructions for glacage here. You will have enough for two cakes. Pour the glaze into the remaining space of the cake ring and place in the freezer for 20 minutes, or until set.

To unmold the mousse, place a 6" cake board (you could just use a 6" circle of stiff cardboard coated with aluminum foil) under the dessert and ease the plastic wrap away. Push from the bottom to release the mousse from the ring. Peel away the acetate and place on a serving platter. If you've used a cake ring, simply invert it into a serving platter and peel away the plastic wrap. Let it thaw in the fridge for a few hours before serving. I decorated the top with melted white chocolate.

Variation: you can add another layer of cake at the bottom: simply bake one sheet of chocolate genoise and use the cake ring to punch out a 6" round of genoise and use it to line the bottom.

24 September 2008

Apple Trifle with Apple Doughnuts

Apple Trifle (with title)
This is my entry to Art You Eat #5: Autumn Edition, founded by Holly of Phe/mom/enon-- do check out the round-up this November, and maybe even make your seasonal dish and join!

Last Sunday I found out (via a text message from Kittymama) that I had won the 2008 Philippine Blog Award for Best Food and Beverage Blog. There was actually an awarding ceremony in Pasay that I couldn't attend. I immediately began to wonder if she was pulling my leg, before realizing that the only reason she'd do that is to be uncharacteristically cruel. You see, the other three blogs that were nominated are all really fantastic blogs: Market Manila, Table for Three, Please, and Kubiertos. It was really such an honor to be counted among these greats of Philippine food blogging.
Apple Dougnuts (small)
The problem then was my mind. It races at the speed of light at such exciting news. The most predominant among them was, "I really wasn't expecting this." and similar strange thoughts that you think would be taking the humble route, but really turn out to be more douchey than anything. Gratitude-- a simple "thank you, you're all very kind," is really the nicest thing to do. It gives respect to the judgment of those who believe in you and believe your work is worth something.

Before you guys came along (yes, I mean the food blogging community), I really never could handle a compliment. In this society, people (okay, maybe my medical school classmates) think that men have incredibly thick skins and like a camel can go on for years on a single compliment while we take the heat of comments that are meant to be friendly but when you add them all up are pretty huge blows to one's ego. After all, I am the guy who usually gets the "Oh, I didn't realize you were kind of fat!" when a girl accidentally jabs my midsection (I have a totally different appearance with or without clothes, I'm sure you know people like that). So it's kind of a shock when someone actually says something nice. I laugh about it in bed like a maniac.

The strange thing is, I never really knew how to give a compliment before you guys came along, either. I don't know when I started to withhold gushing, or believed that people didn't want to hear once in a while that they look good or did a good job. So all in all, visiting all your fantastic blogs, getting my mind blown, my saliva drained, and my stomach grumbling-- it has been a pretty wild and wonderful experience for me. Made me a better person, natch. Thank you for coming here and (hopefully) enjoying my blog, as I (surely and definitely) enjoy yours. Thanks for making me realize there's all this wonderfulness (gastronomic or otherwise) out there, all over the world!

Apple Trifle with Apple Dougnnuts from Maze (serves 6)
Do you ever wonder why the French give such beautiful names to their original desserts-- "Jolie", "Envie", "Satine", "Opera", "Ardechois", "Grenobloise"-- while the English give such long-winded and boring names to theirs? I suppose the latter would be more descriptive, but that's what menus are for! Let's be romantic! Oh, whatever. I was planning on calling this "Pomme de mes yeux" but it's still too long and this is not my original dessert. It's one Michelin-starred chef Jason Atherton's dessert from his restaurant, Maze (part of the Gordon Ramsay empire), which also has a cookbook, which I am thoroughly enjoying. This is a light and elegant dessert with the lovely flavors of the fall. You can opt to just make the individual components instead-- serve the Apple Jelly on its own, eat the Caramel Custard as a pudding with some biscuits, or the Apple Doughnuts on their own. Originally this has a topping of Cider Granita but I didn't have cider and I was not too keen on making a granita for now.

Apple Jelly

  • 250g (1 cup) apple juice (alternatively you could extract the juice of 3 Granny Smith apples)

  • pinch of vitamin C powder (or 1/2 teaspoon lemon juice)

  • 75g (5 tablespoons) water (A)

  • 83g (6 tablespoons + 2 teaspoons) granulated sugar

  • 83g (5-1/2 tablespoons) water (B)

  • 4 teaspoons powdered gelatin

In a small saucepan, combine the sugar and water (B) and bring to a boil over low heat. Let it bubble for a minute to thicken slightly. Cool until it comes to 40°C (105°F), then divide into two and sprinkle the gelatin on top of one half and set aside. Mix the apple juice with the vitamin C powder or lemon juice, water (A), and the half of the sugar syrup without gelatin. Place the half of the sugar syrup with gelatin over very low heat (a double boiler if you are not confident), swirling until all the gelatin is dissolved. Take off the heat and stir in the apple juice. Divide among 6 small serving glasses and chill for at least 6 hours or overnight.

Caramel Custard
  • 83g (6 tablespoons + 2 teaspoons) granulated sugar

  • 75g (5 tablespoons) heavy cream

  • 188g (3/4 cup + 1/2 tablespoon) whole milk

  • 1/2 split vanilla pod, seeds scraped (optional)

  • 12g (1-1/2 tablespoon) cornstarch

  • 2 large egg yolks

Heat a heavy-based saucepan until very hot. Gradually add 50g (1/4 cup) of the sugar a little at a time so that it melts on contact with the pan. Swirl the pan as the sugar caramelizes. When it becomes a dark amber (I find that this point occurs a few seconds just after it foams), pour in 60g (1/4 cup) of the cream, stirring with a wooden spoon to combine. Remove from the heat and leave to cool completely.

Put the milk and vanilla seeds in a small pan and bring a simmer. Turn off the heat as soon as it bubbles up the sides. In a large bowl, whisk together the remaining 33g (2 tablespoons + 2 teaspoons) sugar, egg yolks, cornstarch, and 15g (1 tablespoon) cream until well-combined. Slowly drizzle in the hot milk, whisking all the while. Pour it back into the pan and stir over low heat until it boils for 1 minute, whisking to avoid the bottom and edges burning. Pass the custard through a sieve into a bowl and cover the surface flush with cling film that has been punctured in a few places to let steam escape. Allow to cool completely. Whisk in the caramel vigorously (or use an immersion blender) until smooth. Divide among the serving glasses, layered on top of the apple jelly.

Calvados Cream
  • 125g (1/2 cup) heavy cream

  • 1 tablespoon icing sugar

  • 1 tablespoon Calvados

Whip the cream and sugar together in a small bowl to soft peaks, then fold in the Calvados. Spoon over the caramel custard in each serving glass and chill until serving time.

Apple Purée
  • juice of 1 lemon

  • 450g (1 pound) Granny Smith or Bramley apples

  • 75g (6 tablespoons) granulated sugar

  • 12g (1 tablespoon) unsalted butter

  • scraped vanilla pod from the caramel custard (optional)

Add the lemon juice to a large bowl of cold water. Peel, core, and chop the apples (1/2 inch dice), immersing them into the cold acidulated water as you go. Drain well and pat dry with paper towels. Place the apples in a wide pan with the sugar, butter, and vanilla pod. Cook over a medium-low heat, stirring occasionally, for 15-20 minutes. The apples will be tender but hold their shape. Take out the vanilla pod and purée the apples (ideally with a stick blender to save on clean-up) and turn up the heat to high. Cook until thick. Cool slightly then transfer to a piping bag fitted with a slim nozzle.

Apple Doughnuts (makes about 20)
  • 250g (1-3/4 cup + 1/2 tablespoon) all-purpose flour, plus extra for dusting

  • 1 teaspoon sea salt

  • 25g (2 tablespoons) granulated sugar

  • 7g (1 sachet) fast-acting dried yeast

  • 40g (1/4 cup) warm whole milk

  • 1 large egg, lightly beaten

  • 1/2 tablespoon dark rum

  • 1/2 tablespoon rosewater (I just used... Water.)

  • 40g (3 tablespoons) butter, softened to room temperature

  • sunflower or other neutral oil, for deep-frying

  • 100g (1/2 cup) caster sugar

  • 1 teaspoon ground cinnamon

In a small bowl, stir together the yeast and the milk and set aside. Place the flour, salt, and granulated sugar in a large mixing bowl and stir to combine. Make a well in the center. Pour in the milk, egg, rum, and rosewater. Using a mixer with the dough hook (or your hands, as I did), stir or knead the ingredients until it comes together in a ball. Mix in the butter a little at a time until fully incorporated and the dough is smooth. If the dough still appears too wet, dust with a little flour and knead it in. Transfer the dough to a lightly oiled bowl and cover with cling film. Leave to prove in the fridge overnight (it will double in size).

Bring the dough back to room temperature, then knock it back and knead lightly on a floured surface. Divide in two and roll each portion into a long log about 3-4cm (1-1/2 inch) in diameter. Cut into 20-25g (3/4 oz, the size of a ping pong ball) pieces and place on an oiled baking sheet, making sure there is space in between each. Cover with lightly oiled cling film and prove in a warm place for 1-2 hours until they are almost double in size.

Mix the caster sugar and cinnamon together in a deep plate and set aside. Heat the oil in a deep fryer or deep, heavy pan to 190°C (375°F-- I found that this was too hot and browned too quickly, or I have a bad thermometer, and ended up frying them at 160°C on my thermometer) and deep-fry the doughnuts in small batches until golden brown all over. Drain on paper towels. While still warm, pipe the apple purée into the centers and toss in the cinnamon sugar.


01 June 2008

Passionfruit Vacherin with Blackberry Sauce

Vacherin aux Grenadille avec Sauce aux Ronce Commune
Passionfruit Vacherin with Blackberry Sauce (with title)
A lot of recent occurrences have once again reminded me that health and happiness are extremely fragile and fleeting. Briana Brownlow of the wonderful food blog Figs with Bri (friend to me and my blog and yet another victim of my incessant KIDDING!s and weird comments) has been diagnosed with Stage IV Breast Cancer, only two years after her initial treatment for her newly-diagnosed breast cancer, for which she endured surgery and chemotherapy. When she broke the news on her blog a few months after a hiatus, my heart sank. Just yesterday we were laughing, and now, very suddenly, the skies have darkened.

I'll tell you about a belief of mine. I believe that all human beings are born with an enormous capacity to do evil, selfish things. It's only with that first caress to a mother's breast, or a warm embrace from a kind stranger as the case may be, that a seed of love is planted in the heart of an infant. And with learning about the world that exists outside your own sphere, the friendships we form, and undertaking the crises that we face together, the seed grows into caring, and genuine goodness and concern for other people. You might think I've suddenly gotten all Phoebe Buffay hippie on you, but I'm not at all naive about human nature. It's so easy not to care for others, effortless to be selfish. It's much more difficult to be a good person, something I struggle with everyday.

That's why even with the temporary nature of health and happiness, goodness and kindness are not quite so easy to destroy, because it takes a lot of hard work to be there for others. Three very kind bloggers have taken the initiative to raise funds for Bri's treatment, Jai and Bee of Jugalbandi and Manisha of Indian Food Rocks. From their efforts, several other bloggers have followed and put up fantastic items as raffle prizes (I want so many of them, and I want to win one so bad!). This month's Click Food Photography event hosted as always by Jugalbandi is for Bri, and the theme is yellow. This isn't yet my entry, as I want to come up with something that can really stand a chance among other really fantastic and experienced photographers. You may also visit here to find out how to contribute.

Passionfruit Vacherin with Blackberry Sauce
Hardheaded me insisted on making meringues in 32°C (90°F) heat and amazing humidity, so their stability suffered as they held on to moisture as long as they could. But flavor- and texture-wise, they were still very good. It's the local passionfruit (here, they're baby shit yellow instead of purple) that disappointed me most. I took a heaping spoonful, preparing to be taken aback by undeniable tartness, but crap, it tasted like butter, eggs, and sugar. I might as well have put water in it. I couldn't taste even a little bit of passionfruit-ness! I am never buying these again. I wish I had made lemon curd instead. I also planned on making chocolate fans on top, but I wasn't using my head, and apparently melted chocolate will NEVER set with an ambient temperature of 32°C (90°F). Duh!

Vacherin Shells

  • 3 large egg whites, at room temperature

  • 150g (3/4 cup) superfine sugar

  • 1/8 teaspoon cream of tartar

Preheat the oven to 120°C (250°F). Line a baking sheet with parchment paper. In a stainless steel mixer bowl, beat the egg whites on low speed until frothy. Add a third of the sugar and all of the cream of tartar and beat at high speed until it becomes opaque and no longer grainy when rubbed. Add another third of the sugar and continue beating until it holds soft peaks, then add the rest of the sugar and beat until it holds stiff, glossy peaks. Load into a large piping bag fitted with a 1/4" plain tip and pipe 3" filled circles of meringue (I was able to make 12). Pipe two bands of meringue stacked on top of each other on top of the circumference of each round to form a nest. Bake in the oven for an hour, then open the door for a second to let the steam out, then close the door, turn the oven off, and leave the nests in the warm oven to dry for at least an hour.

Passionfruit Curd
  • 120g (1/2 cup) passionfruit juice, from about 10 passionfruit

  • 100g (1/2 cup) sugar

  • 2 large eggs

  • 112g (1 stick or 1/2 cup) unsalted butter, cut into 8 pieces

In a heatproof bowl set over a pan filled with simmering water, combine the passionfruit juice and the sugar. Whisk together until all the sugar is dissolved. Add in the eggs and whisk thoroughly until combined. As the mixture thickens, add the butter pieces in one at a time, whisking after each addition and waiting until the last is fully incorporated before adding the next. Continue cooking for 4 minutes, when the whisk starts leaving a trail as you stir. Take off the heat and let cool at room temperature, then place cling film flush against the surface and store in the refrigerator.

Blackberry Sauce
  • 225g (1/2 pound) blackberries

  • 2 tablespoons sugar

  • 90g (1/4 cup plus 2 tablespoons) water

  • 1 teaspoon lemon juice

Combine all ingredients in a food processor and process until combined. Pass through a fine sieve to remove all seeds and debris.

Assembly:
To serve, have 120g tempered dark chocolate on hand (instructions for tempering using a hair dryer are here-- the temperatures to follow are to cool between 27-28°C (80-84°F) then take it back up to 30-32°C (86-90°F)). Load it into a small plastic bag or cornet, then snip off the tip and pipe out designs onto parchment paper. Allow to cool (obviously I did that in the fridge as I had no other choice). Pipe an enclosed design onto the serving platter then pour raspberry sauce into the design a little bit at a time, using a spoon to guide it into the dam formed by the chocolate. Place a vacherin shell on top then pipe in some passionfruit curd, then finish it off with a chocolate design.

01 May 2008

Banana Parfait

Banana Parfait (with title)
There was a recent invitation on the Blog Rounds for Filipino doctors to cite why they choose to practice in the Philippines. I obviously didn't participate, because that's not my plan for the moment: I didn't want to appear like a giant hypocrite. While I love my country and I love my home, there's still so much my young heart hasn't seen and experienced yet. One of the reasons I cook so many non-Filipino dishes is for that unique experience. In between, it's always Filipino food (and you will see some here someday, I promise). I originally meant to plate this dessert and call it "Paradise": Banana Parfait Napoleon with Chocolate Sauce. The tourism industry of this country, after all, likes to showcase this country as an inexpensive Shangri-La. However, a few things came to mind over the past few weeks.
One Window
That's the view outside my window. I described it to Ann once as butt-fugly. For some reason, city planners don't care (I don't live in a gated community, unlike many of my well-to-do friends) and my residential area is constantly infiltrated by noisy warehouses and factories. Admittedly I took that a few minutes before rain, but it's not much better with the sun up. There's an actual drum where they incinerate plastic and the fumes saturate the poor air, and worst of all, a stupid bulldozer that just runs forever-- half of it in reverse-- making those loud, awful BEEP! BEEP! BEEP! noises to warn people a hundred miles away to steer clear. I wear earplugs (thank you, Walgreens) so I can study somewhat in peace. At midnight, stupid delivery trucks come in and spread pollution, and stupid drunken construction workers bang on the gate of the warehouse (probably where they sleep, as it's far from their home) to let them in, waking us all up.
Another Window
This is the other side of the house, my brother's view, which is not the street-side. I think that's an avocado tree (so much for my 17 units of Botany). Despite the rusty galvanized rooftops, the green just makes it much better. Amazing how "paradise" can change in a matter of meters.
Banana Parfait (FAIL!)
This is the second failure of "Paradise." I originally adapted this recipe from Grand Finales, where a Banana Snickers Parfait Napoleon was adorned by a majestic puff pastry decoration. I got a little playful and a lot stupid, making a way-too-large and too-heavy decoration that more or less destroyed the whole thing. Why is that bird pecking at a giant stone with a booger on it? I don't know. Does it have retinoblastoma? Why is it lying down with its wings spread? Seriously, is that coagulated blood on the side? It was seriously a WTF moment:

that you go so far on one end of the frustration spectrum and end up on the other side, laughing it off. Never again. I unmolded the others and poured the ganache on one side. Much better. I told Jen that it must be a sign from God for me to get with the program and study already. My cooking will improve when I can focus on it.

But it was still a little too creamy for me. I think my body is now actively craving healthy food and, if you will believe me, healthier desserts (or at least cake, and not something made almost entirely of fat, like a parfait). I recorded a minimum weight of 134.5 pounds twice already, which is a good way from the max of 140 pounds I weighed a few months back. Yay for me.

Banana Parfait
335g (12oz, about 3-4 large) ripe bananas
1 teaspoon lemon juice
15mL (1 tablespoon) dark rum
200g (3/4 cup plus 1 tablespoon) heavy cream, chilled
42g (1/2 cup) sugar
1 teaspoon vanilla

Purée the bananas, lemon juice, and dark rum together. In another bowl, whip together the cream, sugar, and vanilla until it holds soft peaks. Gently fold the banana mixture into the cream, taking care not to deflate the foam too much. Distribute among 6 molds (I used plastic cups) and freeze. To unmold, dip the mold up to just below the level of the parfait in hot tap water for 5 seconds, then turn over onto the serving plate. Refrigerate until ready to serve.

The chocolate ganache is just an equal weight of boiled cream and chopped bittersweet chocolate, but milk chocolate would also be great with bananas.

17 April 2008

Maple, Salted Butter Caramel, and Pear Belle Hélène

Poire Fondantes et Glace à L'érable et Caramel au Beurre Salé
Maple, Salted Butter Caramel, and Pear Belle Hélène (with title)
(I promise it'll be a long time before I talk about medicine again-- I don't particularly like it actually, it just fits the theme. This is my entry to the "Taste of Yellow" blogging event in support of the Lance Armstrong Foundation.) I'm not sure if they ever warned us about this, but for many health professionals, the time comes that you will start to identify people by their disease. When you look after a ward of 30-100 people at a time (it's a government-owned hospital), I confess it's much easier. What are names, anyway, compared to "the baby who had pancreatic inflammation and was always asleep," "brain tumor guy who swore at everyone," "massive tuberculosis man," etc. Everyone knows who and what you're talking about.

My first patient ever as a young clerk was a breast cancer survivor, but it had returned to her lung. In that moment of stupidity and inexperience that you almost say "It's going to be okay," or something equally frowned upon, you're almost thankful that you're too choked up inside to say it. Through her own tears she said that she's willing to embrace whatever God has in store for her, and she won't ever lose faith. From that point on, there would be no more crying about my own worries, no more feeling sorry for myself. She apparently had faith and strength of spirit enough for the both of us, and I'm glad we met. In return, she kept on dropping my name on her subsequent visits, touting me as the "handsomest, kindest doctor ever" (she never told me that, I just heard it from other people who were wondering what the hell I did for her). Ahem. What can I say, she's quite brilliant.

I encountered the senior officer who helped me do the lung drainage on the patient. "(Patient's name)'s back, and she looked just fine." My senior looked at me like I was an alien and said, "WHO?!" "Oh, you know, the breast cancer patient whose lung we drained," "Oh. That's nice." Many patients you know by disease. Some you know by name. A few you know by heart, and I'm the luckier for it.

I just recently made this very elegant (and very decadent) take on a sundae. Everything works perfectly together-- maple, walnuts, pears, caramel, and salt. Have a treadmill ready.

Poached Pears
I've seen several recipes for pears, some calling for a pinch of saffron in the water, lemons and oranges, vanilla, Sauternes, etc. But I didn't want to lose the other flavors in the ice cream (after all, maple syrup co$t$ so much), so I settled for this simple recipe. If you have very underripe pears, increase the sugar to 300g (1-1/2 cups) and the poaching time to 15-25 minutes, depending on how soft you want the pears. I just wanted them soft enough to melt in your mouth but still stand up on the plate. You can also use canned pears.

  • 4 ripe pears

  • 500mL (2 cups) water

  • 150g (3/4 cup) granulated sugar

  • 6 tablespoons honey

Using a small knife, take the core out through the bottom of the pear. Scour away at the seeds with the tip of the knife, but go no farther and leave the stem of the pear intact. Cut out a corona pattern (as shown in the picture) near the stem and strip away the rest of the peel using a vegetable peeler to retain the shape of the pear as much as possible. In a medium saucepan, combine the rest of the ingredients and bring to a boil. Reduce the heat to a slow simmer and submerge all the pears (the drop in temperature will make it appear as though cooking has stopped, but don't turn up the heat-- it will start bubbling again in a while). Turn the pears at least once during cooking. I cooked mine for 12 minutes, or 6 minutes a side. Take out the pears into a deep container, then turn up the heat and boil the syrup for 10 minutes to thicken slightly. Pour this over the pears and cool completely. This keeps in the refrigerator for 3 days.

Maple-Walnut Ice Cream adapted from The Perfect Scoop by David Leibovitz
  • 375mL (1-1/2 cups) milk

  • 2 tablespoons sugar

  • 375mL (1-1/2 cups) heavy cream

  • 5 large egg yolks

  • 240g (180mL or 3/4 cup) dark amber maple syrup

  • 1/8 teaspoon salt

  • 1/4 teaspoon vanilla extract

  • 150g (1-1/2 cups) walnuts

Follow the instructions for making the base here, mixing in the maple syrup, salt, and vanilla extract at the end. Shortly before churning the ice cream, preheat the oven to 175°C (350°F) and set a rack on the top shelf. Place the walnuts on an ungreased sheet pan in a single layer and toast them for 12 minutes. Let them cool completely and chop them coarsely until no piece is bigger than a chocolate chip. Churn the ice cream base and add in the walnuts a few minutes before churning is done, or fold them in to the soft ice cream. Transfer to a freezer container and let it ripen for at least 2 hours or overnight.

Salted Butter Caramel Sauce adapted from The Perfect Scoop
If using salted butter, add only half the quantity of salt. If using coarse or high-quality salt (Maldon, kosher, fleur de sel), double the quantity of salt.
  • 45g (3 tbsp) unsalted butter

  • 75g (6 tbsp) sugar

  • 120g (1/2 cup) heavy cream

  • 1/2 teaspoon salt

Melt the butter over medium heat in a small saucepan. Add the sugar and cook until it starts to smoke and is a deep golden brown. Before this point, the butter may separate, but don't worry. Remove immediately from the heat and quickly add half the cream and whisk it in (keep distance or wear an oven mitt as it will bubble up) until only a few lumps of caramel remain. Stir in the rest of the cream and the salt and whisk until dissolved. Serve warm.

To assemble: Level the bottom of the pear with a sharp knife and set it on a plate. Add a scoop of maple ice cream and drizzle all over with the salted butter caramel.

01 April 2008

Tarzan

Crêpes au Bananes avec Lait Concentré Sucré
Tarzan
Not very long ago, I had a nice conversation with a friend (oh, he knows who he is) which went something like this:
Me: I am such a sucker for pop music!
Other Guy: Yeah, me too!
Me: I'm listening to the Spice Girls!
Other Guy: What the hell is wrong with you?

The truth is, I'm such a sucker for catchy tunes. Even songs that I want to hate in theory like anything of Fergie's creeps into my subconscious and out of nowhere I will suddenly be singing I hope you know, I hope you know that this has nothing to do with you.. And that is why I don't listen to the radio and rely instead on my iPod full of classical tunes and the other artists you're probably tired of hearing by now. If I didn't do that, my head would be filled with Sean Kingston and Fall Out Boy, and honestly who can study in that situation?

In the same way, I've avoided ordering the Tarzan crêpe of Café Breton because of the description-- bananas and condensed milk. Gosh, that sounds so cheesy (it is also one of the cheapest crêpes on the menu). A little kid crêpe. I always opt for more sophisticated-sounding crêpes like Cherries Jubilee, La Delice, and Crêpes Suzette. But in order to grow, you sometimes have to let the wall down and give in to your inner cheese. It takes courage to stand up and say, "HEY, WORLD! I LIKE PLAIN CONDENSED MILK! AND I LISTEN TO CHEESY MUSIC (AT TIMES)!" Because in reality, Tarzan is a really good, lick-the-plate kind of crêpe, screw sophistication. And it is the crêpe I honored by making for my friends when they came around for some post-exam unwinding and XBox.

I also chose to make crêpes for my friends because Faith and her sister Clara wanted to learn some culinary tricks, and it would have taken too much time to bake a cake and to wait for it to cool. I'm not sure if they would ever make it, though, as no amount of demonstration would convince them that wiping a pan clean with your hand down on the hot surface is almost completely harmless. I've made chocolate crêpes before, and I even have a demo. I've improved the timing a lot (I don't have to take it off the heat) by adopting this technique for flipping:

  1. Loosen the edge all around the crêpe with a long, flexible spatula (you see this black tool on my demo).

  2. Lift up the edge on any one point of the crêpe with the spatula and pick up that edge with the fingers of your other hand.

  3. Quickly slip in the whole length of the spatula under the crêpe near the halfway mark. The end of the spatula shouldn't be under the crêpe, or it will tear.

  4. When you lift the spatula, the other half of the circle will come off cleanly. Replace the crêpe upside-down on the pan. I think this is how those drones at the crêperies do it (without the fingers part)-- just watch them.


Tarzan
You will need brown butter for this recipe. Simply melt 3 tablespoons (45g) or slightly more butter in a pan over low heat until it turns a nutty brown color and smells of hazelnuts. There will be dark milk proteins settling at the bottom-- I included them in the recipe for an interesting flavor. If you're feeling confident with your microwave skills (which is the method I used), simply process 45g of butter in a microwave-safe bowl at 50% power at 30-second intervals until it reaches this point. It takes a little daring as the butter will be sputtering in a very hot and small container.

Crêpes adapted from Desserts by Pierre Hermé
  • 320g (1 1/3 cups) whole milk

  • 25g (2 tbsp) sugar

  • 2 large eggs at room temperature

  • 1 large egg yolk at room temperature

  • 2 teaspoons Grand Marnier, Cointreau, or Amaretto

  • 2 teaspoons rum

  • Grated zest of 1/3 orange

  • 2 teaspoons orange juice

  • 33g (3 tbsp) corn oil

  • 45g (3 tbsp) brown butter, at room temperature

  • 120g (3/4 cup + 1 1/2 tbsp) all-purpose flour, sifted

Place all the ingredients except the flour in the container of a blender or food processor. Process until completely smooth. Add the flour and process until it is just incorporated, but you don't want lumps either. Pour into a container with a spout, such as a Pyrex measuring cup. Cover with cling film and chill overnight.

Before cooking, give the batter a short whisk. It should be the consistency of heavy cream; whisk in some milk, a drop at a time, if it is too thick. Follow the demo here for cooking the crêpes. For a high yield with very thin crêpes with slightly crispy edges (the way I prefer them), wait only one second, no longer, before pouring the excess back in the pitcher. For slightly thicker, more velvety crêpes (the way most crêperies make them), wait 4-5 seconds before pouring the excess back. Also, you don't need coalescing bubbles to tell you to flip: the top of the crêpe will look set and if you peek on the underside, it should be golden. It will take about a minute or more. Certainly crêpes that are on the brown side are tastier and more fragrant than pale, milky ones. As you stack the crêpes, sprinkle some additional sugar on top.

Bananas for filling
Allow one banana per serving. Slice the banana into 1/4-inch slices. In a skillet over high heat, melt a pat of butter and sauté the banana with half a tablespoon of sugar for about 30 seconds. Place in the center of a crêpe and fold into a neat package (browner side out). If you prefer, you may spread Nutella on the crêpe before adding the bananas.

Serve on a pool of condensed milk and/or chocolate syrup, and a scoop of ice cream on top. I used dulce de leche ice cream for this one.

02 March 2008

Tropical Bombe

Tropical Bombe (with title)
This is going to be a huge deal for me. It's already been well-established that coconut and I do not have a good working relationship. I think it began when I was a kid and I eagerly poured myself a glass of what I thought was refreshingly cold water. WRONG! It was coconut water. I felt betrayed by my taste buds. I didn't vomit or anything but the taste was not particularly pleasant for me. The following years of my life were also littered with tests to our relationship. Every now and then at a party the only dessert would be fruit salad, with strips of fresh young coconut. "Why do you torment me so?" I asked the coconut, "I thought we'd both be better off if we never encountered each other again, but here you are defiling a perfectly good fruit salad." It didn't answer back because it was coconut. One of the last encounters was when a nice girl offered me some coconut-based dessert. I politely refused but she forced it on me (ooh), assuring and promising me that it was good. I took a huge bite. OH MY GOD. She said, "It's good, no?" Not wanting to hurt her feelings, I nodded eagerly, then proceeded to the toilet to get rid of it all.
Tropical Bombe (bitten)
I realize I might sound a little unpatriotic going about how much I dislike coconut. Truth is, I've been trying to patch up our relationship, and I've started to take it in small doses, like in latik, or desserts made with coconut milk, coconut macaroons made with thick condensed milk, and it's always a truce when I have one of my favorite snacks, Butter Coconut Biscuits (by the way, if anyone has a recipe for this, please do share it!). So today as a peace offering for my bad behavior I'm honoring it for this month's Lasang Pinoy blogging event hosted by Kai of Bucaio, pairing it with our national fruit and other tropical flavors in this flag-raising Tropical Bombe, made with homemade mango sherbet, coconut parfait, pineapple-coconut joconde, mango tuiles, and kalamansi (Philippine lemon) cream. It's a very sweet dessert that's well-balanced by the acidity of the kalamansi. I think it's a perfect reconciliation dessert. This is inspired by pastry chef Michel Willaume's dessert, Delice de Saveurs Exotique Glacé.
Mango Tuiles
Pineapple-Coconut Joconde
This makes twice as much cake as you need. Just save the rest for random snacking.

  • 2 large eggs, at room temperature

  • 75g (2.65 oz) almond flour or almond meal

  • 75g (1/2 cup + 2 tablespoons) confectioner's sugar, sifted

  • 25g (3 tablespoons) all-purpose flour

  • 2 large egg whites, at room temperature

  • 1/8 teaspoon cream of tartar

  • 25g (2 tablespoons) superfine sugar

  • 15g (1 tablespoon) unsalted butter, melted

  • 75g (2.65 oz) crushed pineapple, drained

  • 50g (1.75 oz) desiccated coconut

Grease, line with parchment snugly, and grease again a 10x15" sheet pan. Preheat the oven to 220°C (425°F). In a large bowl, combine the whole eggs, almond flour, and confectioner's sugar. Beat at medium speed until cream-colored and light, about 5 minutes. Sift the flour over the beaten eggs. In another stainless steel bowl using a clean wire whip, beat the egg whites at low speed until foamy. Increase the mixer speed to high and add the cream of tartar and continue whipping until soft peaks are formed. Gradually add the superfine sugar and continue beating until very stiff peaks are formed and the meringue has begun to slip and streak around the side of the bowl. Scoop a third of the meringue into the batter and fold it in until well-incorporated. Add the remaining meringue and fold it gently until completely incorporated. In a small bowl, fold together the melted butter and about a cup of the batter, then fold it back into the rest of the batter until uniformly mixed. Scoop the batter into the prepared baking sheet and smooth with a large spatula. Sprinkle with the crushed pineapple and coconut; don't mind if they sink into the batter. Bake until lightly browned and firm but not dry, about 8-10 minutes. Slip onto the cooling rack, parchment paper and all, and leave for about 15 minutes. Place another rack on top and flip over. Remove the parchment, replace the original rack and flip right-side-up. Divide into two and place in a sturdy tin, separated by parchment paper. Wrap airtight with cling film and freeze for later use.

Mango Sherbet
Since I don't have an ice-cream maker, I used a blender. Just scoop the entire sherbet out and blitz it for a moment (you don't want to melt it, just loosen it) at progressively shorter intervals (3 hours after first putting it in the freezer, then 2 hours, then every hour and a half 3 more times).
  • 236g (1 cup) water

  • 150g (3/4 cup) granulated sugar

  • 2 large mangoes (I used 2 mangoes with a combined weight of 800g, which gave me 480g of puree)

  • calamansi juice, to taste (I used 1 calamansi, or about a teaspoon of lime juice)

In a heavy-bottomed saucepan, combine the sugar and water, then place over high heat and bring to a boil; by this time all the sugar should have dissolved. Set aside to cool. Scoop out all the mango flesh and place in a blender or food processor, then purée until smooth. Drizzle in all the cooled syrup and the calamansi juice (take note that there is no straining of the purée at any point). Place in an ice cream maker and freeze according to the manufacturer's instructions, or just do as I did and place it in the deep freeze and loosen it up periodically.

Coconut Parfait
This is not really meant to be sweet, and therefore is the only component of this dessert that can't be eaten on its own.
  • 60g (1/4 cup) heavy cream, chilled

  • 2 tablespoons (25g) granulated sugar

  • 25g (1-1/2 tablespoon) coconut cream

Whip the cream until it forms soft peaks. Combine the sugar and coconut cream together in a small bowl until dissolved. Fold the sweetened coconut cream and whipped cream together until well-combined. Set aside in an airtight container in the freezer.

Mango Tuile
This is a very versatile cookie that can be used as a garnish just served with coffee. However, it's very sweet, like a mango chip. I wouldn't recommend adding three of these to the finished bombe as I did in the picture; just use one each.
  • 100g (1/2 cup) granulated sugar

  • 50g (5 tablespoons + 2 teaspoons) all-purpose flour

  • 16g (1 tablespoon) orange juice

  • 21g (0.75 oz) mango puree

  • 36g (2-1/2 tablespoons) melted butter

In a medium bowl, mix the flour and sugar together, then whisk in the remaining ingredients one by one until well-incorporated. Leave to rest in an airight container in the refrigerator overnight and for up to a week. Prepare a stencil of a 3" circle from a piece of thick card (from a file folder) or the plastic top of an ice cream or yogurt container. Preheat oven to 150°C (300°F). Line a baking sheet with parchment paper. Prepare another sheet of parchment paper for the cooled tuiles. Place teaspoonfuls of the batter spaced 3" apart on the parchment. Place the stencil on each dollop and using a small offset spatula, spread the batter within the stencil so that it is very thin and even. Scrape off the excess batter back into the bowl. Bake the tuiles for about 12 minutes. Peel off the hot tuiles from the parchment (they will feel like stiff fruit leather), and while warm, cut each into a triangle shape with a pair of scissors. Place each tuile on the other sheet of parchment to cool completely. Repeat with the remaining batter. You can store the tuiles in an airtight container at room temperature for up to 2 days.

Kalamansi Cream
  • 50g (1/4 cup) granulated sugar

  • 1 large egg

  • 30g (2 tablespoons) kalamansi juice

  • 74g (5 tablespoons + 1 teaspoon) unsalted butter

In a medium heatproof bowl set over simmering water, whisk together the sugar, egg, and kalamansi juice. Continue whisking for about 8-10 minutes or until the mixture registers 80°C (180°F) on a thermometer. Take off the heat and strain into a blender, then blitz for about a minute too cool it to 60°C (140°F). Add in the butter, a tablespoon at a time, and continue blending until smooth, about 5 minutes. If you don't have a blender, you can use a food processor, or good old-fashioned vigorous whisking. Place in a small bowl and cover with cling film. Refrigerate for at least 4 hours and up to 7 days.

Assembly
Take the cake out of the freezer and using a 2-1/4" biscuit or cookie cutter, cut out 6 rounds of cake. Take the coconut parfait out of the freezer and scoop out 6 small balls using a melon baller. Place these on a saucer and set aside.

In a 6-serving 3" demisphere silicone mold, scoop in enough mango sherbet to fill it 2/3 full. Using a teaspoon and working quickly, smoosh the sherbet partly up the sides while creating a hollow in the center, making sure the entire inner surface of the mold is filled with sherbet. Place a ball of the parfait in and top with a circle of cake. Press the cake down, letting the sherbet overflow over the rim of the molds. Using a teaspoon or spatula, clean out the excess sherbet that has overflowed. Place in the freezer to firm up.

To serve, place the kalamansi cream in a piping bag fitted with a #3 (3-mm) tip and pipe out a design onto a chilled plate. On a chilled saucer, invert one of the bombes in the mold on top and hit the outside with a hairdryer for about 10 seconds, then slip it out of the mold carefully onto the saucer with an offset spatula. Transfer it onto the chilled plate and stick a mango tuile on top. You may also freeze the whole dessert, plate and all, before adding the tuile.

09 February 2008

Temptation Tower

Temptation Tower (with title)
Here is this month's plated dessert (hopefully I'll be able to make one more before the month is through). I was feeling pumped after my Maya Gold, but I didn't want to make another chocolate dessert, so I headed to the bookstores for some ideas. My definite inspiration for making this is the book Grand Finales: A Neoclassic View of Plated Desserts by Tish Boyle and Tim Moriarty. It all came from the apple chip on one of the desserts, which is one of the most deceptively simple garnishes you can make at home, plus it tastes great, unlike pulled sugar or plain puff pastry. Unfortunately, I can't afford the book as it costs P3000 ($75), so I had to think up my own components for my dessert. Thankfully I still had those damn magazines I bought on sale, one of which was a Pastry Art and Design, which had a recipe for Honey Spice cake, which I present here with a less intimidating approach. Pastry and baking are precise sciences, but not dauntingly so. Only the cake here is measured out; the rest of the components I just banged together on the stove, and guess what: this dessert is so incredibly delicious that I finished mine, apple chip and all, in a minute. I named it Temptation Tower from the apples I used to make it. Though some people say Eve offered Adam a quince at the Garden of Eden, I haven't tasted one before, so it's out of the question.
Mandoline
The thing is, I didn't have a mandoline that would create the very thin (think less than 1/16 inch) slices of apples I needed. I managed to buy a cheap Japanese one which was multifunctional to boot, for only P88 ($2.20). Granted, it'll probably dull after a few uses and that peeler is probably no good, but it's a lot better than shelling out thousands for a professional mandoline (maybe I ought to look into the Home Shopping Network). What I couldn't buy, though, is an extensive set of circular cutters, so I had to make do with my 2.5", 2.75", and 3" biscuit cutters. If I had smaller cutters, I would cut out the centers and make more dramatic compositions:

Ready? Let's make a Temptation Tower! (er... The dessert kind.)

Honey Spice Cake (adapted from a recipe from Finale, a Boston dessertery)
I was disappointed at first when I ate this cake fresh from the oven, since I found it to be chewy. However, after freezing it for storage and thawing it, it became very tender, and I quite liked it. Make sure to use good honey when making the cake.

  • 2g (1 tsp) ground allspice

  • 2g (1 tsp) ground cinnamon

  • 7g (1 tbsp) baking powder

  • 7g (1-1/2 tsp) baking soda

  • 334g (2 cups + 6 tbsp) all-purpose flour

  • 1g (1/4 tsp) salt

  • 167g (1 cup + 5 tbsp + 1 tsp) granulated sugar

  • 134g (3) large whole eggs

  • 63g (6 tbsp) neutral oil, such as Canola, Corn, or Coconut oil

  • 153g (7 tbsp) honey

  • 267g (1 cup + 2 tbsp) orange juice

Grease, line with parchment snugly, and grease again a half-sheetpan (12"x16"x1", but you can use a 10"x15"x1/2" pan as I did with no problems). Preheat the oven to 177°C (350°F). Place the allspice, cinnamon, baking powder, baking soda, all-purpose flour, and salt in a sifter and sift together onto a sheet of waxed paper and set aside. In a large mixer bowl, beat together the eggs, sugar, oil, and honey at high speed until thick, pale, and no longer grainy when rubbed between the fingers, about 7 minutes. Sprinkle a third of the flour mixture onto the batter and mix at low speed for 10 seconds just to combine (alternatively you can just fold it in by hand), making sure to scrape down the sides of the bowl. Fold in half of the orange juice until combined. Repeat with another third of the flour, the rest of the orange juice, and the last bit of flour. Pour into the prepared pan and even it out with a large spatula. Bake for 14-19 minutes (it took me 17 minutes, but if you have a bigger pan, it will be closer to 14 minutes), or until a cake tester inserted in the center comes out with only a few moist crumbs clinging. Slip out of the pan onto a cooling rack and let cool completely for an hour. This cake may be frozen, wrapped twice in cling film then in foil, for a month.

Sautéed Apples
For every 2 individual servings, you'll need:
  • 1 large firm and tart apple, such as Granny Smith or Fuji

  • 14g (1 tbsp) salted butter (or use unsalted butter with a tiny pinch of salt)

  • 2 tablespoons brown sugar

  • 1 teaspoon cinnamon

Peel, core, and cut the apple into 16 wedges. In a medium bowl, toss the apples with the cinnamon and brown sugar until well-combined. In a heavy-bottomed saucepan over medium heat, melt the butter, then add the apple wedges. Keep tossing the apples in the butter (the juice will be released from the apples, then thicken) for about 15-20 minutes, or until tender. This can be chilled in the refrigerator for a few days; just reheat before use.

Streusel
I could have bake this on top of the cake, but I didn't want to mess up the baking time, so I decided to keep it separate and heat it up later.
  • 115g (1 stick) cold salted butter (or use unsalted butter with a pinch of salt), cut into 1/2-inch cubes

  • 140g (1 cup) all-purpose flour

  • 2g (1 tsp) ground cinnamon

  • 70g (1/3 cup) granulated sugar or vanilla sugar

  • 70g (1/3 cup) packed brown sugar

Place the butter cubes in a large bowl and sift the flour and cinnamon over them. Add the sugars and work with a pastry blender or your fingers until crumbly. Chill until needed. You may also freeze it for a month, covered airtight.

Yogurt Cream
This cream is slightly sour, and achieves a great balance with the apples and streusel. If you don't like the taste of yogurt, simply substitute vanilla or caramel ice cream.
  • 250g (1 cup) unsweetened natural yogurt

  • 7g (1 sachet) powdered gelatin

  • 240g (1 cup) heavy cream, chilled

  • 2 tablespoons sugar

In a small microwave-proof bowl, place 2 tablespoons of the yogurt and sprinkle the gelatin on top. Let sit for a minute, then microwave on LOW for 10 seconds, then stir to dissolve the gelatin completely. Transfer to a large bowl and fold the rest of the yogurt in and set aside at room temperature. In a large chilled bowl, place the cream and whip, adding the sugar gradually, until firm peaks are formed. Fold in the yogurt and set aside in the refrigerator.

Apple Chips
I made a mistake the first time and forgot to use parchment paper. The chips stuck to my nonstick pan, and I had to discard them. I'm pretty sure these would keep well in temperate climates in an airtight tin for a day, but to be safe, I prepared them the same day. They're really quite easy. Make sure there's no peel on the apples when you slice them, as they dehydrate at a faster rate, causing wrinkling. However, the peel makes it easier to slice apples on a mandolin, so you may want to follow my recommended procedure here.
  • 3 firm apples

  • 60g (1/4 cup) confectioner's sugar

Line the bottom of a sheet pan with parchment paper. Preheat the oven to 94°C (200°F). Using a mandoline, slice the apples blossom side-down at the most 1/16" thick; you should be able to see through the slices. Using a set of circular cutters, cut out individual circles of apple slices, in the process removing the peel. Use a second smaller cutter to remove the core of the apple. Using a sifter, sprinkle the prepared pan with confectioner's sugar, then arrange the apples slices in various fashions, overlapping them for each individual garnish. Dust the tops of the slices evenly with more icing sugar (you do not have to use up all of the sugar; just return it when done). Dry in the oven for 40 minutes. If you've made wider rings as I have, you may need to dry them for longer. When done, peel the chips of the parchment and they should not bend.

Assembly: (makes about 12 servings)
Using a 3" cutter, cut out circles of the cake. Sprinkle the top with streusel (you may use the cutter as a guide so it doesn't go over the edge). You may place them all in a sheet pan and under the broiler for a few minutes to warm the streusel through, or just do as I did and place each individual serving on a microwavable plate and microwave on HIGH for 45 seconds. Arrange the sautéed apples on top slightly overlapping in a rose-petal formation. Top with a scoop of the yogurt cream and stand an apple chip on top like a tower or resting on the side as in the diagram I drew, on the right (use your imagination). Serve immediately as the cream will soften the apple chip and make it wilt in a few minutes.

11 January 2008

Maya Gold

Maya Gold (with title)
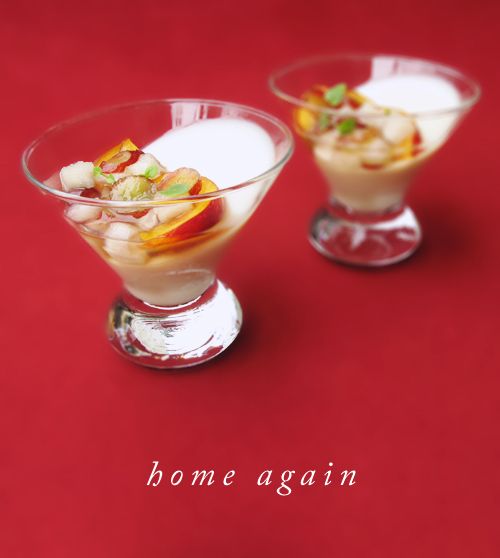
Remember when I said (uh, just two days ago) that I would no longer be eating desserts not made by myself? The problem with that is, if you're a home baker with a desire to learn, if you want to lose any weight, your stint is pretty much over. Also, this blog would instantly die (well, I could still make non-desserts, but let's face it, desserts are mad fun: food of artists). The solution is to torture myself with the ambition to make entremets. Or not just an entremet, but a plated dessert. It will take me literally days to make one, is plenty of work, and pushes all your culinary skills to the limit while learning more.
Maya Gold with a bite through it
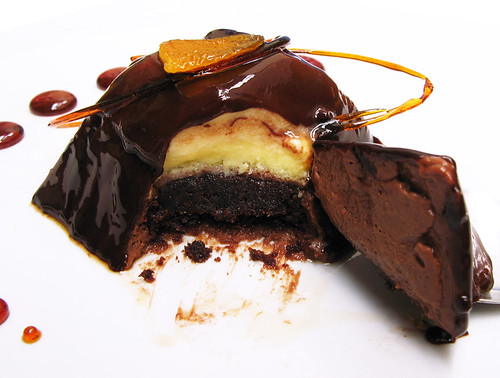
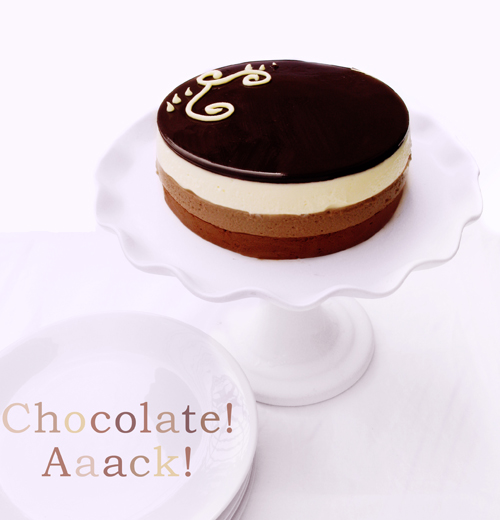
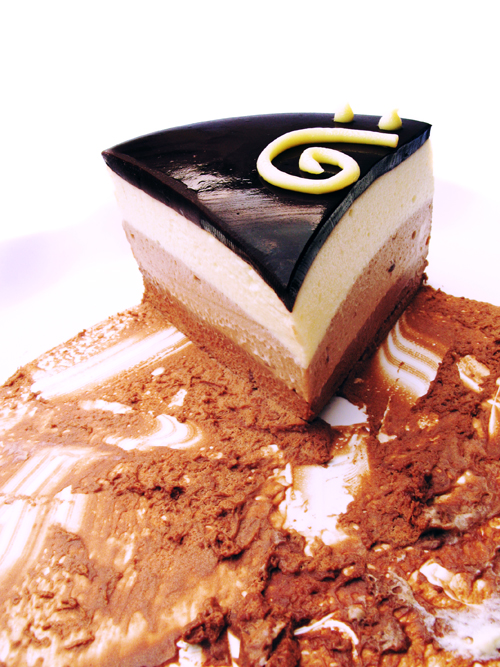
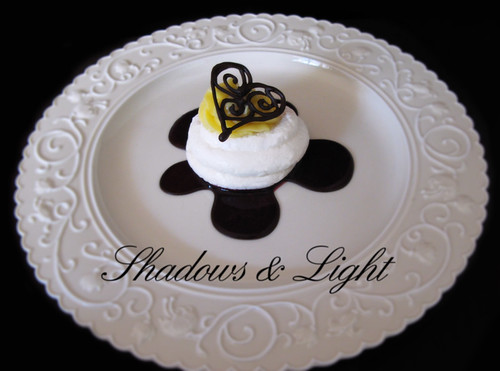
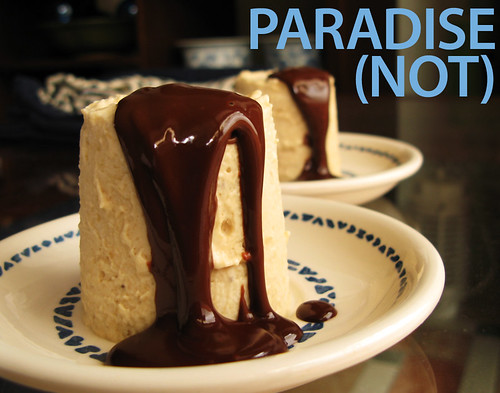
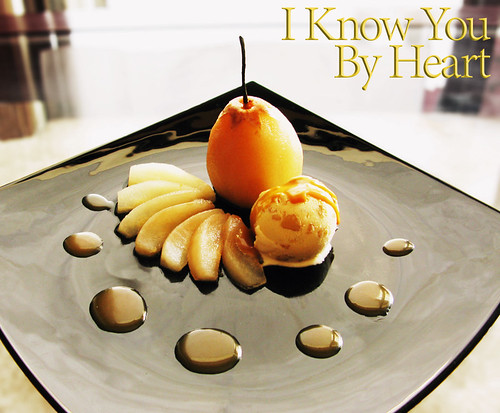
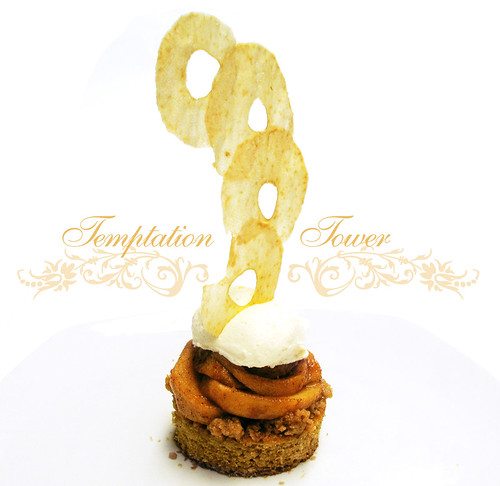
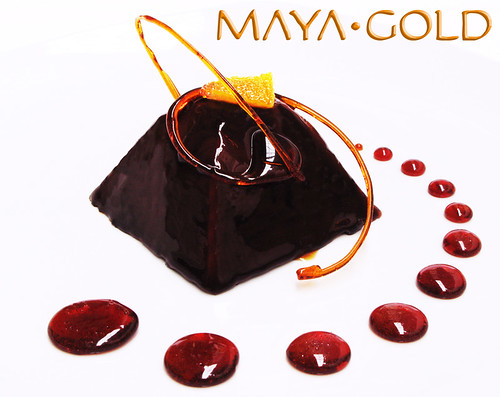
The entremet is an orange crème brûlée with dark chocolate orange mousse, fudge brownie base, and enrobed in chocolate mirroire glacage. The decorations are candied orange peel and caramel doodads (not a technical term). It's not an original concept, I was inspired by the Amore of the Bizu Patisserie. However, I've never tasted that entremet and this is my original interpretation, construction, and recipe. So it's not quite, but almost a "signature" dessert, I guess. What's most important, though, is that it tastes smashing. The depth of the brownie, the lightness of the crème brûlée, and the character of the orange chocolate mousse work together splendidly. I didn't show my parents the plating of the dessert, they just got the regular glazed entremet. If they saw it, they might become fearful for my future, hahaha (oh, don't take that seriously). Just because you're a good doctor doesn't mean you can let your artistic soul just die! Speaking of which, I just received a new commission to make another Obstetrics and Gynecology poster, which I'm both excited and scared about, as usual.
Organic Orange Chocolates
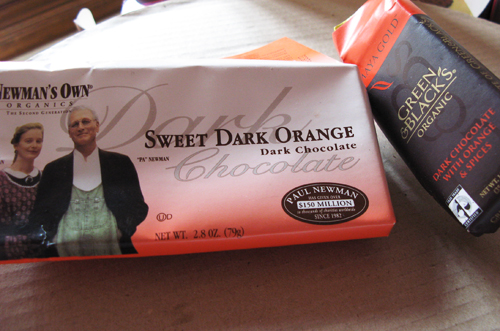
Because milk chocolate orange gets such a bad rap, I used organic dark chocolate with orange (bought at Healthy Options, THE health food store in the Philippines) for a sophisticated flavor, making this the most expensive dessert I've produced. Here we have the pleasant and lower-priced Newman's Own Organic Sweet Dark Orange and the more expensive but totally worth it Green and Black's Organic Maya Gold, which is the inspiration and namesake of my dessert. The Maya Gold, and I'm not being a chocolate snob or inciting a UK-vs-US choco-battle here, is superior in every way except price-- mouth feel, depth, and flavor. The spices are all secret, but I'll wager there's pepper, cinnamon, and cloves in there. However, the Newman's Own chocolate is still very good, and while not as interesting flavor-wise, is still a quality choice. Ready? Let's go make entremets!
Maya Gold making process
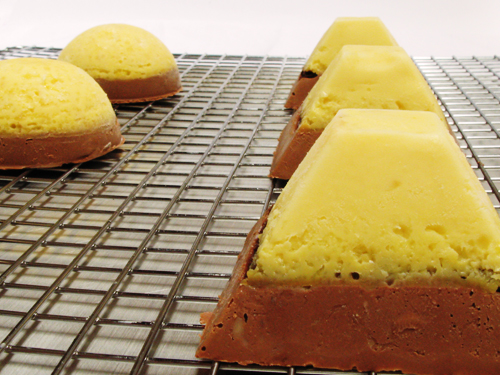
This dessert can be constructed in an entremet ring, but since the inspiration was "Maya Gold," there's no better shape than pyramidal, so I used silicon molds (about 3" demisphere and 3" flat-topped pyramid), sold for P700 ($17 or £7, at Robinson's Manila and SM Makati).

Orange Crème Brûlée (adapted from Sherry Yard's The Secrets of Baking)

  • 750g (3 cups) heavy cream

  • 100g (1/2 cup) granulated sugar

  • 1 vanilla bean, split and scraped, or 1/2 teaspoon vanilla extract

  • 1 tablespoon chopped orange zest

  • 6 large egg yolks, chilled

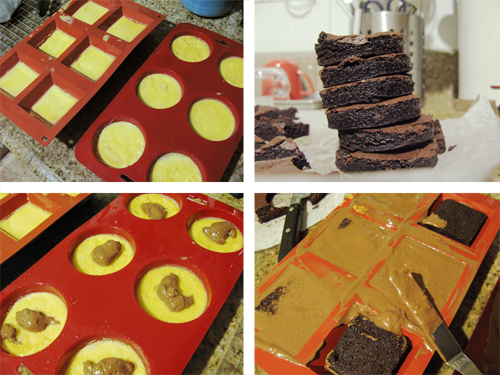
Preheat the oven to 150°C (300°F).Stir the cream, sugar, vanilla, and orange zest in a heavy saucepan over medium heat until the sugar is dissolved and bring to a simmer. Let it rest for 15 minutes. During that time, in a large mixing bowl, whisk together 6 egg yolks. Once the cream has rested, drizzle it in slowly into the yolks, whisking all the while, and once half a cup has gone in, you can add it more liberally, still whisking the whole time. Whisk until well-blended. Strain into a pitcher. Divide among the 12 silicon containers (if you want to serve it as is, just use 6 ramekins)-- they should leave enough space for the brownie and mousse, so you only want each one filled to 2/3 or 3/4 of the capacity. Place the containers in a large roasting pan and fill the roasting pan with boiling water going to 2/3 of the height of the silicon container. Be careful that water doesn't enter the custard, especially as you place it in the oven. Bake for about 25 minutes-- that's the time you should start checking it, at least-- until the center is jiggly but not sloshy. If it's not yet done, just check again at 5 minute intervals. Take it out of the oven, taking care not to get the custards wet. Let them cool, cover with plastic wrap, and freeze in their containers.

Dark Chocolate Orange Mousse
  • 1 teaspoon powdered gelatin

  • 1 teaspoon water

  • 100g (3.5oz) dark chocolate with orange oil, broken into small pieces

  • 33g (2 tablespoons + 1/2 teaspoon) heavy cream

  • 1 large egg yolk

  • 5g (3/4 tablespoon- GET A SCALE) granulated sugar

  • 150g (1-1/4 cup) heavy cream

Sprinkle the gelatin over the water in a small bowl and set aside. In the microwave or a very small saucepan, bring the 33g cream to a boil and pour over the chocolate. Stir until all the chocolate has melted and set aside. In a heatproof bowl set over simmering water (not touching the bottom of the bowl), whisk together the egg yolk and sugar until no longer grainy. Add the softened gelatin and whisk until well-blended and smooth. Take the bowl off the heat and whisk in the chocolate ganache and 150g cream until well-blended. Do not store in the refrigerator because it will set-- continue assembling the dessert instead. This mousse can also be eaten on its own.

Fudge Brownies (adapted from King Arthur's The Baker's Companion)
  • 225g (1 cup or 2 sticks) unsalted butter

  • 425g (2 cups packed) brown sugar

  • 65g (3/4 cup) Dutch-process cocoa

  • 1 teaspoon salt

  • 1 teaspoon baking powder

  • 1 tablespoon vanilla extract

  • 4 large eggs

  • 170g (1-1/2 cups) all-purpose flour

Preheat the oven to 175°C (350°F). Grease, line with parchment, and grease again a 9x13" pan. In a microwave-safe bowl or saucepan over very low heat, melt the butter, then add the sugar and stir to combine. Stir in the cocoa, salt, baking powder, and vanilla. Cool until you can comfortably test it with your finger (it should feel like comfortably hot bath water). Whisk in the eggs madly until smooth, then add the flour, stirring until smooth. Spoon into the prepared pan and bake for 25 minutes, or until a cake tester or knife poked in the middle shows only moist crumbs. Cool for 15 minutes on a rack, then pull out the brownies with the parchment in one piece and let cool completely.

Chocolate Glacage: follow the recipe here.

Assembly:
Take the crème brûlées out of the freezer and pipe or spoon a thin layer of mousse on the surface. Don't be lazy as I was and just put a dollop in the center; the seam will show. You really have to make sure it reaches the edges. Using a round biscuit cutter (for demispheres) or a knife (for pyramids), cut the brownie into 2.5" rounds or 2.25" squares-- the measurement doesn't matter as long as it is not flush with the sides of the mold. Use the remaining mousse to completely fill the mold and swipe a spatula over the top to level it. Cover with plastic wrap and freeze a few hours until firm-- it can be frozen for a week, away from strong odors.
Unmolded Maya Golds
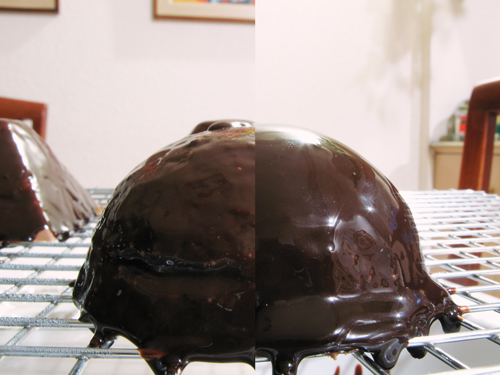
Pop the prepared entremets out of the molds and set on a cooling rack or dipping tray over a sheet pan. Allow any frost to thaw, about 15-30 minutes. To save on glacage, I elevated the cooling rack and placed a small bowl on the bottom for recycling.
Maya Gold glazing set-up
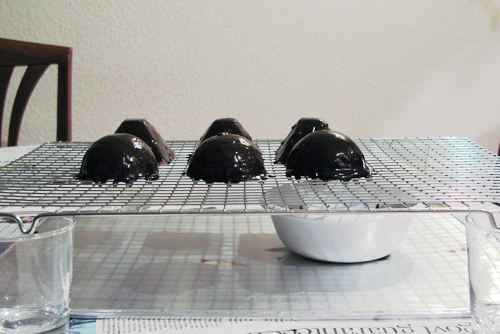
Working quickly, pour the glacage over the top of each. It's advisable to glaze them at least twice for a smoother finish:
Once vs. Twice Glazed Maya Golds
Leave in the refrigerator until serving time.

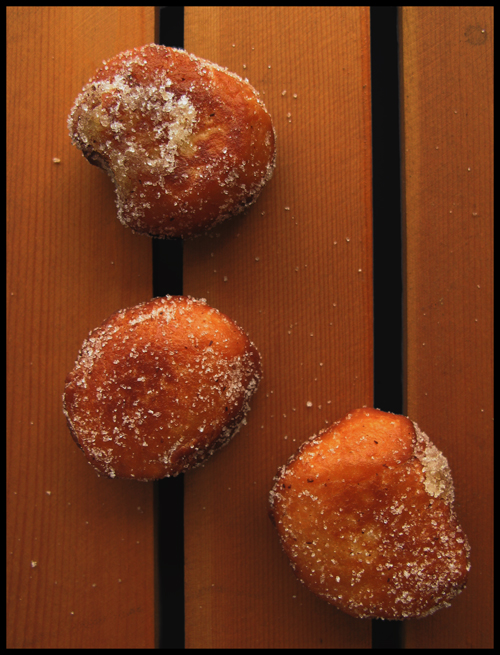
Candied Orange Peel (adapted from Chocolate Desserts by Pierre Hermé)
  • 3 medium-sized oranges

  • 2 cups (500mL) water

  • 1 cup (200g) sugar

  • 2 tablespoons (30g) freshly squeezed lemon juice

  • 5 black peppercorns, bruised

  • 1 piece star anise

Put a large pot of water (not the quantity specified here, that is to be used later) to a boil. Cut off a thin slice off the bottom and top of the oranges and cut off wide bands of peel about 1 inch across, making sure that a sliver of fruit is included in the peel as you cut it off. Toss in the boiling water and boil for two minutes, then remove from the water with a slotted spoon into a colander and rinse under cold running water for 2 minutes, then repeat the boiling and cooling process twice more. Set aside. Place the remaiing ingredients (water, sugar, and all) into a large saucepan and bring to a boil. Add the peel and adjust the heat to very low so the syrup simmers gently. Allow to simmer, stirring occasionally, for 1-1/2 hours. Remove the casserole from heat, and with the cover still on, allow to macerate overnight. The next day, pour into a canning jar and store in the refrigerator for up to 3 weeks. It can also be dried on a rack and coated in sugar.

To make the caramel, I have to confess there is no recipe-- I just "winged it." I placed half a cup of sugar and a quarter cup of water into a medium saucepan and let it boil until it reaches a deep amber color, then plunged the bottom in cold water to stop cooking. When the syrup cools enough to run from a spoon in a thread (if it drips, it's too hot), take the loaded spoon and create all sorts of designs on a nonstick sheet pan or parchment paper and allow to cool. I used "jewel" shapes and swirls to keep in theme.

20 December 2007

Dark Chocolate Soufflé Cakes With Espresso-Chocolate Sauce

Dark Chocolate Soufflé Cakes With Espresso-Chocolate Sauce (with title)
Here is another recipe that Noah was "challenging" me to make. He wanted a soufflé, but for the heart of it to melt, like a lava cake. Undercooking a soufflé won't work since the lack of heat will cause it to quickly deflate (since the heat hasn't set the egg yet), and the foamy structure of the egg white too quickly absorbs the heat of the oven, so the window between egg white foam and soufflé is too small. There's only one solution: the heart shouldn't be made of egg white foam at all. This is chocolate dessert guru Alice Medrich's recipe, and it fits Noah's description so exactly it still makes me grin till now.
Dark Chocolate Soufflé Cakes With Espresso-Chocolate Sauce
The thing is: I think soufflés are overrated. I was served one in renowned restaurant Le Soufflé in Baguio, and I thought it tasted too much like an egg. I thought adding more strawberry coulis would fix it, but it just tasted like a jammed-up omelet. Okay, that's being harsh, but anyway: neither is it difficult to make. The best thing about this recipe is that it does chocolate justice (with both bittersweet chocolate and cocoa in the recipe), doesn't taste eggy, can be prepared in advance (! a definite plus for the annoyingly a la minute dessert), and is completely foolproof: I made it once before (long before I started blogging) and it worked flawlessly the first time. Don't let the pictures fool you: even refrigerated for 2 days, this soufflé has definite rising power; just bake it in a very hot oven and don't pull it out too early. Plus: that warm surprise waiting in the center is a sure crowd-pleaser.


The soufflés will naturally deflate over time, so ask 25 minutes in advance if your guests want one. You could serve them directly from the oven onto a heatproof surface, but warn your guests that it will be searing-hot in the middle.

Sauce

  • 1 tsp instant espresso powder (I just used 2 tsps instant coffee)

  • 2 tbsp warm water

  • 225g (8oz) bittersweet or semisweet chocolate, coarsely chopped

  • 85g (3oz or 6 tablespoons) unsalted butter, cut into 8 pieces

  • 2 good pinches table salt


Soufflé
  • 2 tbsp unsweetened natural cocoa powder

  • 3 large eggs whites

  • 2 large egg yolks

  • 1/8 tsp. cream of tartar

  • 3 tbsp granulated sugar

  • additional softened (not melted) butter and sugar for greasing ramekins


Put a metal or Pyrex pie plate or cake pan in the freezer. Lightly butter 6 6-oz (180mL) ramekins or custard cups, then coat inside with sugar and tap out the excess.

If baking right away, position a rack on the lower third of the oven and preheat the oven to 205°C (400°F) In a small bowl, combine the coffee powder with 2 tablespoons warm water and stir to dissolve. In a medium heatproof bowl over a pot of barely simmering water, melt the chocolate and butter until smooth. Alternatively you can use the microwave, stirring every 30 seconds. If only small chunks remain, use the residual heat of the container to melt the remaining chunks to avoid burning the chocolate. Add the salt and stir together well. Take 5 tablespoons (85g) of the chocolate mixture and stir into the espresso well. Pour the espresso mixture into the chilled pie plate and freeze until firm, about 10 minutes (avoid freezing it longer as it will turn too icy). Meanwhile, whisk in 2 egg yolks and the cocoa into the remaining warm chocolate mixture.

Take the pie plate from the freezer and use a teaspoon to scrape it into six rough balls and set each onto the center of each prepared ramekin and refrigerate in the meantime.

In a clean, dry bowl, add the 3 egg whites and sprinkle in the cream of tartar. Beat on medium-high speed until it mounds gently. Gradually beat in the sugar and beat until the whites hold medium-stiff peaks when the beaters are lifted (the tips of the peaks curl but the whites are still glossy, moist, and flexible). Using a rubber spatula, fold a quarter of the egg whites into the chocolate to lighten it, then scrape the remaining whites into the bowl and gently fold until well-combined, taking care not to deflate the whites. Divide the batter evenly among the ramekins and level the tops gently with the back of a spoon. (At this point, you can refrigerate the soufflés for up to 2 days. Cover the tops of the ramekins collectively or individually with cling film.)

Remove the cling film from the tops of the ramekins (if prepared in advance) and bake in the preheated oven for 11-14 minutes, adding a minute or two if they were refrigerated (I find they can take 20 minutes with no problem if refrigerated, plus you'll get that rising-over-the-rim action of a classic soufflé). The soufflé cakes should be puffed and possibly a little cracked on top. Let cool a few minutes before serving.