11 February 2008

Crema de Fruta Tarts

Crema de Fruta Tarts (with title)
I don't know what happened to me. I am deathly afraid of saying those 3 words (apparently not of the other 3 more harmful words-- "more food, please"). I used to say them often. Now I can only say them in the context of a humorous statement. Even if I really want to, I need something to disguise it and the recipient is just left wondering how much of it I meant.

I know many of you will be piping in, "If you mean it, say it, or you'll regret it." Unfortunately, experience has shown me that it's when I do say it that the regret starts. The person in question feels pressure to live up to it, or I'm seen as too intense or borderline. The thing is, I admit it feels wonderful to be the recipient. But I know myself. I don't think I know many other people well enough to assume for them that it's a good thing to be loved by me. Maybe I'm just not that person. I would think that maybe I'm just selfish, but I like making people feel that they're loved somehow, like in the food I make or the cakes I bake. Just not in words. Maybe I should just make the rule now: if I've said it as a joke, I already meant it (the problem with that is I take it even more personally when people don't like the food-- oh, what a tangled web I weave..). These (hopefully) original tarts, patterned after Crema de Fruta, a now-classic Filipino dessert of layered chiffon cake, custard, fruit cocktail, and gelatin "mirror" is my entry to the Mini Pie Revolution 2: Small Tarts have Big Hearts food blogging event founded and hosted by my good online buddy Ann of redacted recipes and Karyn of Hot Potato..

While this doesn't have cake, there's never enough depth in a tart to include pastry cream, fruits, peach slices (no matter how thinly you slice them), and gelatin. So I scrapped the gelatin, except for a light brushing of gelatinized light peach syrup on top. It doesn't really add much anyway. I used "Good Cook" (a California-n brand) heart tins that measured 3-1/4" (8cm) on the septum, which sold for 3 at P150 ($3.75). One real (much shallower) heart tartlet pan with a removable bottom costs P280 ($7). Uh, no thanks.

Paté Brisée (good for 4 3-1/4" heart tins)

  • 130g (9 tbsp or 1 stick + 1 tbsp) unsalted butter, room temperature

  • 1 large egg yolk

  • 210g (1-1/2 cups) all-purpose flour

  • 50g (1/2 cup) confectioner's sugar

  • 1/4 tsp salt

Using a mixer with the paddle attachment if you have one, beat the butter until creamy and clinging to the sides of the bowl. Beat in the egg yolk until combined. Sift together the flour, sugar, and salt over the butter while beating. Stop when you have the appearance of fine crumbs (a few larger pieces of butter are fine). Gather into a log, pressing together well, and wrap in cling film. Let it rest in the refrigerator for at least 4 hours. Slice the log into 1/8" thick pieces, then line the tins with the pieces only slightly overlapping, pressing them well together to make them even and make sure there are no spaces in between (alternatively you could just tamp on a giant blob of dough, but I like the slice technique because it creates a very even crust throughout). Cut off the excess. Line with foil, making sure it goes over the sides, and freeze for at least 30 minutes. Preheat the oven to 190°F (375°F). Bake the crusts until light golden, about 18 minutes. Remove the foil and place on a rack to cool for 15 minutes, then flip them out onto the palm of your hand carefully. Make sure all the sides are supported by your palm so they don't fall apart (actually if you pressed them well together, it will be quite durable). Let them cool on a rack completely.

Crema de Fruta custard
Unlike pastry cream, this recipe has water, and is runnier, sweeter, lighter, and smoother. It's suited to tartlets because you don't have to slice them and worry about the filling running out. If you want to translate this recipe to a large tart, use a regular pastry cream instead.
  • 100g (1/2 cup) granulated sugar

  • 23g (2 tbsp + 2 tsp) cake flour

  • 330g (1 cup + 6 tbsp) whole milk

  • 3 large egg yolks

  • 90g (6 tbsp) water

Combine all the ingredients in a heavy-bottomed saucepan over medium heat. Bring to a boil, whisking constantly, until thickened and creamy.

To assemble:
  • 1 small can of peach slices in light syrup, drained very well

  • 3 single serves of fruit cocktail, drained very well

Spoon the tart shells with custard half-full. Spoon fruit cocktail into the custard, pressing it in so the custard flows to the top of the fruit. Slice each peach slice into 4 thin wedges, then decorate the tops of the tarts with the peach slices.
09 February 2008

Temptation Tower

Temptation Tower (with title)
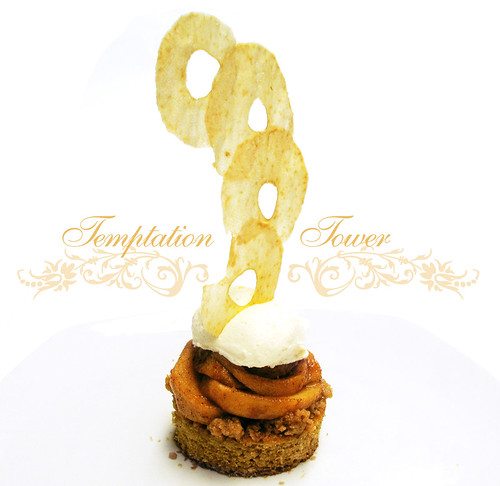
Here is this month's plated dessert (hopefully I'll be able to make one more before the month is through). I was feeling pumped after my Maya Gold, but I didn't want to make another chocolate dessert, so I headed to the bookstores for some ideas. My definite inspiration for making this is the book Grand Finales: A Neoclassic View of Plated Desserts by Tish Boyle and Tim Moriarty. It all came from the apple chip on one of the desserts, which is one of the most deceptively simple garnishes you can make at home, plus it tastes great, unlike pulled sugar or plain puff pastry. Unfortunately, I can't afford the book as it costs P3000 ($75), so I had to think up my own components for my dessert. Thankfully I still had those damn magazines I bought on sale, one of which was a Pastry Art and Design, which had a recipe for Honey Spice cake, which I present here with a less intimidating approach. Pastry and baking are precise sciences, but not dauntingly so. Only the cake here is measured out; the rest of the components I just banged together on the stove, and guess what: this dessert is so incredibly delicious that I finished mine, apple chip and all, in a minute. I named it Temptation Tower from the apples I used to make it. Though some people say Eve offered Adam a quince at the Garden of Eden, I haven't tasted one before, so it's out of the question.
Mandoline
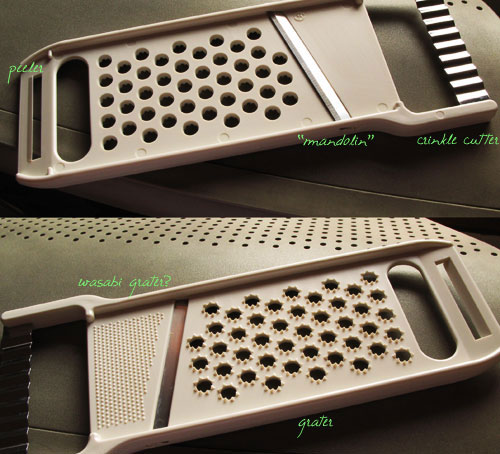
The thing is, I didn't have a mandoline that would create the very thin (think less than 1/16 inch) slices of apples I needed. I managed to buy a cheap Japanese one which was multifunctional to boot, for only P88 ($2.20). Granted, it'll probably dull after a few uses and that peeler is probably no good, but it's a lot better than shelling out thousands for a professional mandoline (maybe I ought to look into the Home Shopping Network). What I couldn't buy, though, is an extensive set of circular cutters, so I had to make do with my 2.5", 2.75", and 3" biscuit cutters. If I had smaller cutters, I would cut out the centers and make more dramatic compositions:

Ready? Let's make a Temptation Tower! (er... The dessert kind.)

Honey Spice Cake (adapted from a recipe from Finale, a Boston dessertery)
I was disappointed at first when I ate this cake fresh from the oven, since I found it to be chewy. However, after freezing it for storage and thawing it, it became very tender, and I quite liked it. Make sure to use good honey when making the cake.

  • 2g (1 tsp) ground allspice

  • 2g (1 tsp) ground cinnamon

  • 7g (1 tbsp) baking powder

  • 7g (1-1/2 tsp) baking soda

  • 334g (2 cups + 6 tbsp) all-purpose flour

  • 1g (1/4 tsp) salt

  • 167g (1 cup + 5 tbsp + 1 tsp) granulated sugar

  • 134g (3) large whole eggs

  • 63g (6 tbsp) neutral oil, such as Canola, Corn, or Coconut oil

  • 153g (7 tbsp) honey

  • 267g (1 cup + 2 tbsp) orange juice

Grease, line with parchment snugly, and grease again a half-sheetpan (12"x16"x1", but you can use a 10"x15"x1/2" pan as I did with no problems). Preheat the oven to 177°C (350°F). Place the allspice, cinnamon, baking powder, baking soda, all-purpose flour, and salt in a sifter and sift together onto a sheet of waxed paper and set aside. In a large mixer bowl, beat together the eggs, sugar, oil, and honey at high speed until thick, pale, and no longer grainy when rubbed between the fingers, about 7 minutes. Sprinkle a third of the flour mixture onto the batter and mix at low speed for 10 seconds just to combine (alternatively you can just fold it in by hand), making sure to scrape down the sides of the bowl. Fold in half of the orange juice until combined. Repeat with another third of the flour, the rest of the orange juice, and the last bit of flour. Pour into the prepared pan and even it out with a large spatula. Bake for 14-19 minutes (it took me 17 minutes, but if you have a bigger pan, it will be closer to 14 minutes), or until a cake tester inserted in the center comes out with only a few moist crumbs clinging. Slip out of the pan onto a cooling rack and let cool completely for an hour. This cake may be frozen, wrapped twice in cling film then in foil, for a month.

Sautéed Apples
For every 2 individual servings, you'll need:
  • 1 large firm and tart apple, such as Granny Smith or Fuji

  • 14g (1 tbsp) salted butter (or use unsalted butter with a tiny pinch of salt)

  • 2 tablespoons brown sugar

  • 1 teaspoon cinnamon

Peel, core, and cut the apple into 16 wedges. In a medium bowl, toss the apples with the cinnamon and brown sugar until well-combined. In a heavy-bottomed saucepan over medium heat, melt the butter, then add the apple wedges. Keep tossing the apples in the butter (the juice will be released from the apples, then thicken) for about 15-20 minutes, or until tender. This can be chilled in the refrigerator for a few days; just reheat before use.

Streusel
I could have bake this on top of the cake, but I didn't want to mess up the baking time, so I decided to keep it separate and heat it up later.
  • 115g (1 stick) cold salted butter (or use unsalted butter with a pinch of salt), cut into 1/2-inch cubes

  • 140g (1 cup) all-purpose flour

  • 2g (1 tsp) ground cinnamon

  • 70g (1/3 cup) granulated sugar or vanilla sugar

  • 70g (1/3 cup) packed brown sugar

Place the butter cubes in a large bowl and sift the flour and cinnamon over them. Add the sugars and work with a pastry blender or your fingers until crumbly. Chill until needed. You may also freeze it for a month, covered airtight.

Yogurt Cream
This cream is slightly sour, and achieves a great balance with the apples and streusel. If you don't like the taste of yogurt, simply substitute vanilla or caramel ice cream.
  • 250g (1 cup) unsweetened natural yogurt

  • 7g (1 sachet) powdered gelatin

  • 240g (1 cup) heavy cream, chilled

  • 2 tablespoons sugar

In a small microwave-proof bowl, place 2 tablespoons of the yogurt and sprinkle the gelatin on top. Let sit for a minute, then microwave on LOW for 10 seconds, then stir to dissolve the gelatin completely. Transfer to a large bowl and fold the rest of the yogurt in and set aside at room temperature. In a large chilled bowl, place the cream and whip, adding the sugar gradually, until firm peaks are formed. Fold in the yogurt and set aside in the refrigerator.

Apple Chips
I made a mistake the first time and forgot to use parchment paper. The chips stuck to my nonstick pan, and I had to discard them. I'm pretty sure these would keep well in temperate climates in an airtight tin for a day, but to be safe, I prepared them the same day. They're really quite easy. Make sure there's no peel on the apples when you slice them, as they dehydrate at a faster rate, causing wrinkling. However, the peel makes it easier to slice apples on a mandolin, so you may want to follow my recommended procedure here.
  • 3 firm apples

  • 60g (1/4 cup) confectioner's sugar

Line the bottom of a sheet pan with parchment paper. Preheat the oven to 94°C (200°F). Using a mandoline, slice the apples blossom side-down at the most 1/16" thick; you should be able to see through the slices. Using a set of circular cutters, cut out individual circles of apple slices, in the process removing the peel. Use a second smaller cutter to remove the core of the apple. Using a sifter, sprinkle the prepared pan with confectioner's sugar, then arrange the apples slices in various fashions, overlapping them for each individual garnish. Dust the tops of the slices evenly with more icing sugar (you do not have to use up all of the sugar; just return it when done). Dry in the oven for 40 minutes. If you've made wider rings as I have, you may need to dry them for longer. When done, peel the chips of the parchment and they should not bend.

Assembly: (makes about 12 servings)
Using a 3" cutter, cut out circles of the cake. Sprinkle the top with streusel (you may use the cutter as a guide so it doesn't go over the edge). You may place them all in a sheet pan and under the broiler for a few minutes to warm the streusel through, or just do as I did and place each individual serving on a microwavable plate and microwave on HIGH for 45 seconds. Arrange the sautéed apples on top slightly overlapping in a rose-petal formation. Top with a scoop of the yogurt cream and stand an apple chip on top like a tower or resting on the side as in the diagram I drew, on the right (use your imagination). Serve immediately as the cream will soften the apple chip and make it wilt in a few minutes.

08 February 2008

Charmed

My PGH Barkada
WOULD YOU WANT THESE PEOPLE TO BE YOUR DOCTORS?

I was going for a "Do you know where your children are?" vibe with that but there's only so much tone you can project with the written word (FYI: those are 7 very competent doctors in the picture, just so you're not confused). That's a picture of me with 6 of my closest friends (by no means all of them). I'm the third one from the left if you haven't figured it out. I've been feeling a little funny after reading a few comments about my appearance, which is a pretty standard reaction from me. I really am bad at taking it. I remember walking around campus in my ugly, ugly medical school uniform and a group of 3 young women passed by. After they passed me, one of them who thought I must have had ears made of mushrooms said, "Pwede na." (translation: "Acceptable.") The weird thing is, I heard the same thing again from a different group of people years later. I was laughing all the way home. I won't tell you the two stories of how some people flirted with me, because if I'm terrible at accepting backhanded compliments, I am far, far, worse when it's overt flirting. I'm more used to handling horrible comments like "You look like Gollum." Compliments are like a sneak attack. (Except when it comes to my food, wink wink.)
Torn Book
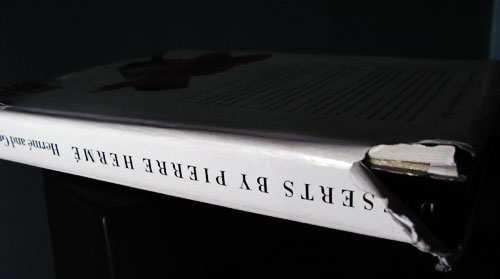
I tried to work whatever charm skills I had into getting this book at a discount (Desserts by Pierre Hermé, now very hard-to-find). It was originally selling for P1680 ($42) a National Bookstore, the Philippines' largest bookseller, but it looked like it had been attacked by rabid dogs on the spine and dustcover. I've been wanting this book for months two other things I am really, really bad at are haggling and hiding the fact that I am dying to buy the item in question. I asked a friendly saleslady if she could give me a discount as the book looked like ass on rat, and she was very helpful and went to management, who determined they could give a 20% discount! W00t! Granted, it's still pricey given its condition, but I didn't want to push my luck. I wasn't even aware you could ask for a discount at a large retail chain.

P.S.: Dottie's (2nd from left) shoulder makes it look like my shirt was unbuttoned to an uncomfortable degree. Just saying.

06 February 2008

Shrimp Scampi Pizza

Pizza di Gamberi alla Scampi
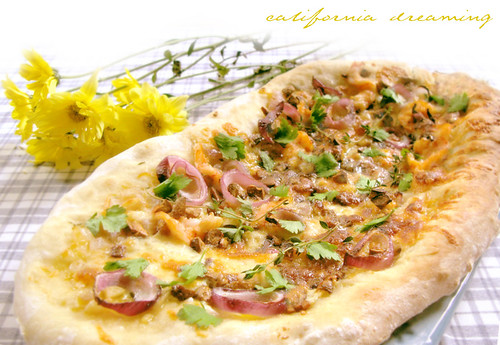
Shrimp Scampi Pizza (with title)
Today is Ash Wednesday, or as Tina Fey described it, "the day when Catholics creep out their co-workers." Which kind of made me chuckle, because 1) it is Tina Fey, and 2) the only real-life point of reference I have consists of people going, "Oh, crap! I forgot it's Ash Wednesday!" (paraphrased) It's a little unnerving to think about what it would be like to suddenly become the minority, and freaky that I will soon find out for real. For no reason, I researched how many Jewish people there were in the Philippines, since I knew none personally, and it turns out there are at the most 500, and probably none in my age bracket (I got to read a few touching/sad stories in the process), and only one synagogue (Temple Emil in Manila). You really take for granted being understood (by default), but it's the differences that make life exciting and learning possible.
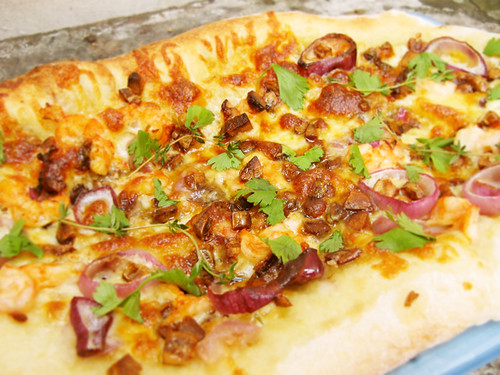
Shrimp Scampi Pizza (close-up)
What does that have to do with a shrimp scampi pizza? Nothing, except for the fasting and abstinence that we (usually) practice this season of Lent. Though I think that to serve such an honestly delicious pizza would be missing the point, ha ha ha. Obviously I made this the same day as the maple-glazed pumpkin and blue cheese pizza, and I chose this flavor because it's one of my father's favorites at California Pizza Kitchen, and also one of the more expensive ones on the menu. Once again the toppings aren't traditional, except in the sense that it is a California-n pizza, where the only rule is there are no rules (please do not kill me for breaking out that annoying cliché, it really is appropriate in this case). On the other hand, true Neapolitan pizza has only fresh yeast, no oil, and must use a wood-burning oven, among other rules. Yeah. Not in this lifetime.

Follow the pizza link above for the recipe I used for the dough. I still used a 350g dough ball stretched into a 12-inch, er, oval. Again, make sure you have all the ingredients ready before dressing the pizza-- you should only take a minute at most to dress it before it goes in the oven.

Garlic Shallot Butter

  • 70g (5 tbsp) butter

  • 1/4 cup minced shallots (I used 1 small onion or 70g)

  • 2 cloves garlic, minced

  • 1/2 tsp dried thyme (I used fresh)

  • 1/4 tsp salt

  • pinch white pepper

  • 80mL (1/3 cup) Chardonnay (I used dry white wine)

  • 15mL (1 tbsp) lemon juice

  • 1 teaspoon chicken broth base or bouillon cube

Place a large skillet over medium-high heat and melt 1 tablespoon (14g) of the butter. Add the shallot, garlic, and thyme and cook for a minute. Add the salt, white pepper, Chardonnay, and lemon juice, reduce the heat to low, and cook, stirring, until it is reduced to 1/2 cup. Remove the pan from the heat and whisk in the remaining butter. Once cool, this butter freezes well in an airight container (thaw before using).

Roasted Garlic
  • 1 head garlic, coarseley chopped

  • olive oil

Preheat the oven to 160°C (325°F). Spread the garlic in a single layer on a sheet pan and drizzle with olive oil, tossing to coat. Roast in the oven for 15 minutes, or until the edges are starting to brown. Scrape up the garlic, redistribute it in the pan, and continue roasting for another 10 minutes or until light golden.

Shrimp Scampi Pizza
  • 100g (1-1/2 cups) mozzarella cheese, freshly shredded

  • 1 small onion, preferably white, sliced into 1/8" thick rings

  • 12 medium shrimp, peeled, deveined and cut in half lengthwise/ sagittally

  • 2 teaspoons fresh oregano

  • small handful Italian parsley, chopped

Place a pizza stone on the bottom of the oven. Preheat the oven to 260°C (500°F) for at least 15 minutes. Stretch the dough on your pizza peel (that has been liberally dusted with cornmeal) to a 12-inch round with a slightly raised rim. Spread the garlic shallot butter over the surface within the rim. Scatter the mozzarella over the butter. Evenly distribute the onions, garlic, and shrimp. Transfer to the oven and immediately lower the temperature to 220°C (425°F). Bake until the crust is golden, the shrimp is completely opaque, and the cheese at the center is bubbly, about 15 minutes. Take out the oven and sprinkle the oregano and parsley over.

01 February 2008

Bacon-Wrapped Baked Eggs with Cream Cheese Biscuits and Arugula

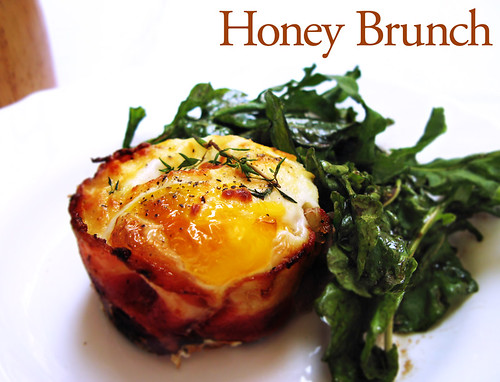
Bacon-Wrapped Baked Eggs with Cream Cheese Biscuits and Arugula (with title)
Although I really should, I don't eat breakfast. It's a bad habit I picked up in med school, when sometimes the best you can do is a granola bar or yogurt drink while walking to the hospital. It didn't really bother me as I don't have an appetite in the morning, but it got really bad when I had to assist an operation that lasted from 7AM to 4:30PM, and all I had was said tiny granola bar and water. It wouldn't have mattered, really, if only the surgeons didn't start dictating their lunch orders. Grr. Knowing me, I probably rushed to the nearest McDonald's immediately afterwards and pigged out on a quarter pounder. Right now, if I didn't spend the wee hours of the morning watching The/A Daily Show with Jon Stewart and designing stuff (PS: I hope the writer's strike ends soon, but that means no breakfast forever), I would wake up early for some beans and toast at least.
Cream Cheese Biscuits
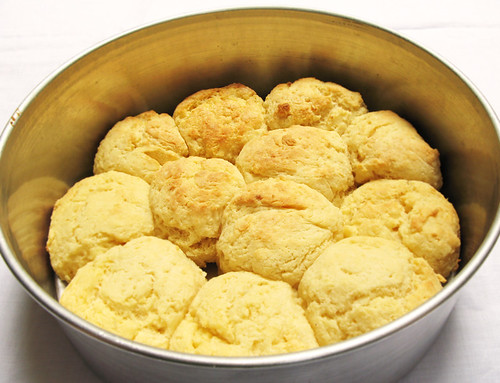
So I thought I'd wake up at a decent, normal-person hour to make biscuits for the first time, but I failed again and ended up making a breakfasty lunch. The biscuits are something I conjured up from a mash of everything I've read about biscuits, plus the need to finish a half-package of cream cheese. The presentation is something I took from Bon Appetit magazine. The biscuits tasted and looked great, even though I FORGOT TO INCLUDE THE BAKING SODA. I have no idea why, but that should teach me to write stuff down. In any case, the rise was acceptable. The biscuits are ultra-moist and wonderful, if a bit on the salty side (the better to eat with jam, my dear) and something you must absolutely finish on the same day, since the next day, the moistness is gone and it's just... there. If I were to organize some fancy brunch, I would make these again... With jam, honey, or maple syrup on the side, just to be a bit more unhealthy but deadly delicious.

I do not know why all recipes for baked eggs call for 15-20 minutes. I don't like the yolks cooked all the way through (though I would understand health-wise why people would be concerned). These are my first baked eggs and I would definitely not bake them for as long as I did the next time, to make a more delicate and decadent dish.

Cream Cheese Biscuits

  • 280g (2 cups) all-purpose flour, preferably unbleached

  • 1 tablespoon double-acting baking powder

  • 1 tablespoon sugar

  • 1 teaspoon salt

  • 1/2 teaspoon baking soda

  • 55g (4 tbsp) cold unsalted butter, cut into 1/4-inch cubes

  • 240g (1 cup) cold buttermilk, preferably low-fat (I used coddled milk, or 240g milk + 1 tbsp lemon juice, left to stand for 10 minutes)

  • 110g (4oz or 1/2 package) cream cheese, softened

  • additional 140g (1 cup) all-purpose flour

  • additional 30g (2 tbsp) unsalted butter, melted

Preheat the oven to 260°C (500°F). Sprinkle a baking sheet with the additional all-purpose flour. Spray a 9-inch round cake pan with nonstick spray. Whisk together the flour, baking powder, sugar, salt, and baking soda until well-combined. Scatter the butter cubes and cream cheese evenly over the mixture and cut into it with a pastry blender or rub it in with your fingers until the mixture resembles coarse cornmeal (alternatively you can process it in a food processor, with 8 1-second pulses). Add the buttermilk and stir with a rubber spatula until just incorporated.

Working quickly with the wet dough, use a 1/4 cup (60mL) measure to scoop out level amounts of dough onto the prepared baking sheet. You should be able to make about 12 evenly-sized mounds. Dust the tops of the mounds with flour from the sheet. Pick up a mound of dough and gently shape into a rough ball, shake off the excess flour, and place in the prepared cake pan as photographed above. Brush the tops with melted butter, taking care not to flatten them. Bake in the middle rack of the oven for 5 minutes, then reduce the temperature to 230°C (450°F) and continue to bake until deep golden, about 14 minutes. Cool in pan for 2 minutes, then take out of the pan and break apart (I sliced them cleanly with a knife), and cool for 5 more minutes.

Bacon-Wrapped Baked Eggs with Cream Cheese Biscuits
For a single serving, you will need:
  • 2-1/2 thick rashers of bacon

  • a half of a cream cheese biscuit

  • a small handful (about 20g or 3/4oz) of sharp cheddar cheese, grated

  • a small handful (about 20g or 3/4oz) of Gruyere cheese, grated

  • 1 large egg

  • minced fresh thyme

Preheat the oven to 200°C (400°F). Heat a large skillet over medium heat and fry the bacon for about 4 minutes or until brown but still pliable. Drain on paper towels. Reserve the bacon drippings. Line the sides of a 1-cup custard cup/ramekin with 2 slices of bacon, forming a collar. Place half a slice of bacon on the bottom. Place a biscuit half on the bottom, then sprinkle most of both cheeses over the top. Crack an egg in the center and sprinkle with the remaining cheese, thyme, and fresh-cracked black pepper. Bake until the egg whites are almost set, about 20 minutes (though I would definitely prefer it on the rarer side). Let stand at room temperature for 5 minutes. Run a small knife around the edge of the cups, tilt on to the serving plate and slide the whole dish out.

Arugula with Balsamic Vinaigrette
  • 60g (1/4 cup) balsamic vinegar

  • 2 teaspoons Dijon mustard

  • 2 tablespoons extra-virgin olive oil

  • 2 tablespoons bacon drippings from the baked eggs above

  • 115g (4oz) arugula (rocket)

Whisk the vinegar, mustard, olive oil, and bacon dripping together. Season with salt and pepper to taste. Add the arugula and toss lightly. Serve alongside the baked eggs.