02 July 2007

Clafoutis aux Cerise (with how-to)

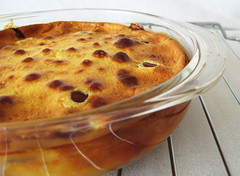
(Cherry Clafouti) I think someone heard my prayers and stocked fresh cherries at Crossings supermarket. The even weirder bit is that they only cost $1.40 for a little more than 500 grams. I bought that much because I thought I'd be making pie (in hindsight it wasn't nearly enough for pie), but I thought, what better way to bring out the unadulterated taste of cherries than with a clafouti? I can always buy cherry pie filling, and I've tasted that before. I've never had clafouti before. It's a rustic french dessert that resembles many things: a pudding, a flan, a thick crepe. But I used part of a recipe from Dorie Greenspan's Paris Sweets, with the recipe here.
Cherry Clafoutis
The recipe called for pitted cherries. It's traditionally with the pits since it intensifies the flavor and prevents the juice from coloring the custard pink, but I liked the idea of easy eat-ability. Kind of a mistake. The juices ran out of the cherries and water-logged my clafouti. After a while, though, it reabsorbed the juice, so it was saved. The taste was great, but it relies too much on the quality of the cherries, which I don't think were the strong point of my cheap ones. But still, we finished it in less than twelve hours.

My dad had to ask me how in the world did I get all the pits out? It's a simple trick that requires a paper clip unbent to an "S" shape.

Take out the stem of the cherry and plunge one of the ends of the paper clip into the exposed stem end.

Take a feel for the pit and loosen it with the paper clip "spoon," then hook it around the lower end of the pit.

Flick out the pit. Sometimes the flesh will be so adherent to the pit that this won't be easy without causing some damage, but it's not a big deal.

Voilà! Minimum damage and a minimal exit wound (also the same as the entry wound, by the way, heh heh). This also works on olives, by the way. If you plan on doing this a lot, I would recommend a cherry pitter, just because it's faster, less messy, and won't strain your fingers, but who wants a one-job wonder for a few dozen cherries?

Another trick you can use is to drive three nails through a board so that the points are the vertices to a small triangle, then plunge each cherry through this, leaving the pit on top and the cherry perforated. However, the safety aspect of it is not so hot.

My Grandfather

I wrote something for my grandfather Antonio "Anto" Manguerra, who died last June 27. He was 83.
If you want to read it, click here:
http://drmanggy.blogspot.com/2007/07/my-grandfather.html

30 June 2007

Frozen Banana-Peanut Butter Bonbons

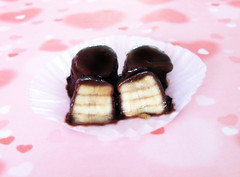
When I ended up with so much extra glaze from the Chocolate Éclairs, I thought of this old article about frozen fruit bonbons. I bought a bunch of bananas, layered it with Good Shepherd Peanut Butter, froze them, dropped them in the room-temperature glaze, then froze them again. The result isn't too pretty till you look inside at the layers, but the rich and decadent taste is undeniable.
Frozen Banana-Peanut Butter Bonbons
This isn't the most original of flavor combinations-- add a marhsmallow and it's Elvis's favorite sandwich filling. Anyway, these are great for popping in your mouth when you need a quick snack.

29 June 2007

PGH: Design by the People, For Nobody

During my entire stay at the Philippine General Hospital, many frustrating experiences have arisen from the simple act of getting around. And once you get the hang of things, you'll be even more frustrated trying to explain to the poor patients and watchers how to get from point A to B. I've said it before and here it is again, for the record in my blog:

Philippine General Hospital design sucks.

Consider the following:

Exhibit A is a new wall treatment the administration chose to cover up the soiled walls of the first floor (it's as close to an approximation as I can get with my memory and my trying to suppress the painful imagery). I used to call it the "Schizont/Plasmodium" wall. Yes, the first floor is painted with these not-quite-arabesque peach and mint green spermatozoa. Why? Is it supposed to make people forget their frustrations in the hospital? Is it supposed to make it a pleasant place? Bitter experience has shown me that it does not. All it succeeds in is making the hospital a hideous place. It does not feel like a respectable hospital as much as it does the outside of a second-rate kindergarten building.

Exhibit B is a sample of the few signs that they have put up on a few posts. One of the elements of environmental design is "Wayfinding." This is PGH's sorry attempt to make it easier for patients to find particular places. It's a failsafe to the Information Desk in front. First of all, given the way PGH is built, those arrows mean shit. Second, it doesn't work. I still get questions all the time as to where is what.

What's worse is that PGH doesn't even bother to make it easy for people to care for their patients. Take, for example, the Arterial Blood Gas (ABG) Laboratory. It's actually located in the laboratory wing but since you can get the results in a few minutes, you have to access it through a separate door. What's worse is that the door leading to the laboratory and the door leading to the ABG room, which are both on the 2nd floor, are not accessible on the same floor-- that is, if you have a bunch of specimens you want to give to the lab and one of them is an ABG, you have to go to the main lab window, give the specimens, go down to the 1st floor, then go back up again on another staircase and give it to the ABG room. This is the type of shit we let the poor watchers go through on a daily basis. SOLUTION: make the rooms all accessible to each other. Simple as that.

The wards have a notoriously unintuitive arrangement. When you enter the main door, you have Wards 1 and 3 on the right, and Wards 9 and 11 (what?) on the left. On the second floor to these wards are 2 and 4 on the right, and 10 and 12 on the left. There is a "central block" further along where the elevators are located, then further than that is Ward 5 and 7 on the right, Ward 14a and 15 on the left, with Ward 6 and 8 on the right on the second floor, and 14b and 16 on the left on the second floor. All you have to assist you if you are a new patient are those piss-poor signs above, there isn't even a schematic map for any of this anywhere. SOLUTION: A map. People can read this better than they can figure out the numbering scheme. There are so many other ways: one is color-coding the wings with a single strip of color running throughout the walls on white. Much classier than the sperm. Then, on the signs, use the colors with the floor number, like Ward 14a: 1(red). Ward 14b: 2(red). There's probably an even better way to do this, I'm just to mad to think about it.

By the way, Ward 14a and Ward 14b? Are we TOO superstitious? Why not just call it Ward 17 and at least we'd be consistent?

Problem: many (in fact all but 2) elevators' call buttons don't work. That is just shameful and I'm pretty sure you have to have elevators checked by a technician EVERY GODDAMN YEAR. Fixing the elevators will ensure that when the patients need to go up ASAP, they are UP ASAP. Before you get television sets for the suites or whatever, you need to make sure that NOBODY USES A FUCKING COIN TO KNOCK ON THE DOORS OF THE ELEVATORS.

Dr. Alfiler said that he'll be installing a pneumatic tube system that will allow us to send samples to the lab remotely. Who's willing to bet that it will soon be filled with cobwebs? How about a hole in one of the tubes where a big pile of blood will accumulate? Also, what will this do to the citrate tubes?

Another nitpick: next to the elevators, there should be a list of what each floor contains. Next to none of the patients know that floor 2=more wards, 3=operating rooms, 4=nursery, 5=pulmonology offices (? see, even I'm doubtful), 6=dialysis and cardiovascular offices. It's just stupid not to include those.

Design is more than just the way something looks. It pertains also to the function, the efficiency, the usefulness of that object. It results in a bright light in your head that makes a simple color scheme turn a chaotic mess into a well-oiled machine. Take a look of this design of a staircase from the Rem Koolhass bulding in Chicago designed by Ludwig Mies van der Rohe. It seamlessly incorporates a ramp into a staircase, so without inconveniencing a subset of users, a beautiful design results in cost-efficiency, space-efficiency, and just looks absolutely cool.

(Credit: Ben of Noisy Decent Graphics)

26 June 2007

Éclairs au Chocolat (with how-to)

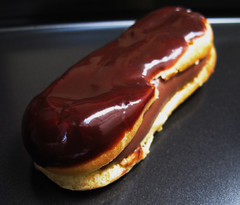
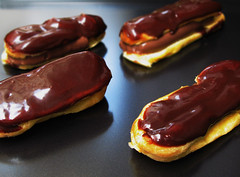
(Chocolate Éclairs) Unless you are building a skill, there's no reason to bake something that you can buy for cheap and is excellent. I remember the éclairs of Dulcinea are good, but they are not cheap. So I was excited to make this recipe by Pierre Hermé (again) for éclairs. However, there is a bonus and a unique touch: the crème pâtissière is also chocolate-flavored, so it isn't quite like anything else out there. There is a problem, though: the pastry shell (pâte à choux) is incredibly difficult to make. So many places to fail.
Chocolate Éclair
Chocolate Éclairs
To begin, have all the ingredients at hand. Again.

Bring the milk, water, a stick of butter, and a pinch each of sugar and salt to a rapid boil:

Then dump all the flour in. Of course, there are no photos of this, since once you do, you have to stir like mad for 2 or so minutes, and I can't take a picture while doing that. In my zeal, I dumped the flour too forcefully and the boiling mixture splattered on my left index finger. OUCH. Couldn't soothe it, had to stir like mad. The flour gelatinizes in the liquid, and stirring it for 2 minutes until a crust forms on the bottom dries out all the moisture, so you can add as many eggs as you can without thinning the batter.

It will come to a ball like the one above. Move it to a bowl where you can beat in the eggs with a hand mixer.

After the first egg, the dough will look separated and ugly. But after the 4th egg, it will come back together again. Place in a pastry bag.

Pipe out 4-inch shapes onto your baking sheets lined with parchment paper. Of course, I sucked at this.

Bake for 7 minutes, then open the door a little, bake for 12 minutes, then rotate the pans top to bottom, back to front, left to right, and bake for 8 more minutes. It's supposed to rise to 3 times its size. The heat creates steam, hollowing out the inside, while a crust forms on the outside. Unfortunately, I don't think my oven was hot enough, so it only rose to twice its size and it was not completely hollow. Time to buy an oven thermometer? (Those are P500/$10. Ouch.)

Slice in half, then spread the glaze on each top half and fill with chocolate pastry cream, then sandwich together.

What is the lesson to be learned? CHECK YOUR OVEN TEMPERATURE!!!! Don't trust its internal thermostat.