Opera
L'Opera / Gateau Clichy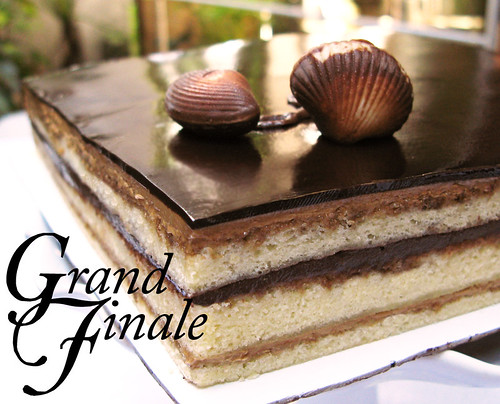
Continuing from my previous post about the first French-style pâtisserie I went to (pardon the misinformation-- the first true pastry shop I went to was Dulcinea, a Spanish pasteleria), let me take you back once again when we (5 or 6 of us, I think) were there, sampling each other's cakes to maximize the experience. Now, I could have sworn one of the cakes was famous, I just didn't know which one it was. Since people still believed I was a better baker than I was and I was very much a cocky bastard, I told my friend Ads that one day I'd replicate whatever classic cake that was. I soon learned I was talking about the Opera cake, which is made of almond joconde (biscuit, not in the English, American, or Filipino sense of the word) layered with coffee buttercream and ganache, then finished off supposedly with ganache. Now, that is probably a bundle of 14 skills I haven't yet performed in the kitchen. When I learned, however, that blanched almonds cost P160 per 100g ($4 or £1.60), I balked, because you're never quite sure if the finished product will ever match what they prepare in the professional pastry shop for much less.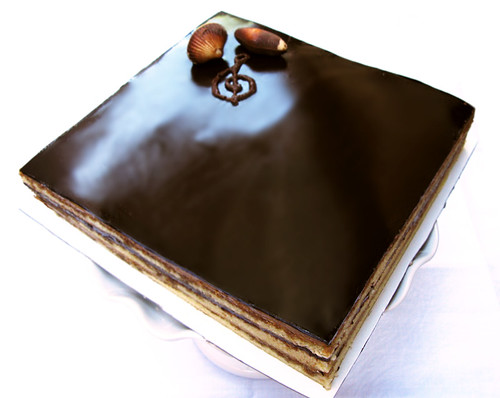
But my birthday came up. I'd made cakes for Genie's, Clara's, Faith's, and Graeme's (though he wasn't around to eat it, heh) birthdays, and I needed something grand to culminate the year of growing dessert-skill-wise. Also, it's good for conquering your fears. I was going to make this classic cake for the first time and serve it to my closest friends, gulp! And to add to the number of skills I could try my hand at, I subbed in glacage (mirroire glaze) for the ganache on top, as many pastry shops might do, but the original creators of the Opera might sneer at. Guess what? It's easier, looks smashing, and some even say it's their favorite layer. I adapted this recipe from my unofficial blogging "mentor", Clement at A la Cuisine!, who in turn adapted it from Dorie Greenspan's Paris Sweets, who in turn adapted it from the Dalloyau, one of the pastry shops credited with its creation way back in 1903. The price of a slice of this cake at the Dalloyau is €5 (P350, $8, or £3.50), and a slice of this at Bizu is P150 ($3.60 or £1.50). Ready to conquer your fears? (Okay, just mine?) Here we go!
I did buy 225g of ground almonds from Tobi's house of nuts, which are guaranteed to be fresh (I knew, because they let me taste the slivers). Don't bother buying them pre-ground from Santi's, which I love, but I doubt the nuts are freshly ground and rotated out of the shelves (I once got ground hazelnuts from their shelves. OLD!). Grinding quickly makes the nut oil rancid. I don't have a food processor so I used a blender (if you're going to do this, make sure the blades are sharp and you're skilled at taking the blender apart and back together in a flash). Making sure the appliance is completely dry, load half the nuts with 25g of the icing sugar you'll use in the recipe. Pulse repeatedly, scraping down the sides of the bowl or pitcher if some nuts stick to the sides. Empty into a coarse sieve over a bowl and lightly tap the sieve to leave only the large unprocessed pieces in. Return this to the appliance and keep repeating until no large pieces are left. Do this with the other half of the nuts and 25g more of the icing sugar (you'll incorporate only 175g later, since the other 50g are in the nuts). Yes, I spent an hour doing this, but it's totally worth it.
Opera
Joconde
Preheat the oven to 220°C (425°F). Spray two 12-1/2 x 15-1/2-inch sheet pans (jelly roll pans with raised edges) with nonstick spray, then line with parchment paper cut exactly to fit the bottom and sides (fold at the edge to get a neat box-shape). Spray the parchment with more nonstick spray, making sure all corners are coated. I only had 10 x 15-inch sheet pans, so my joconde came out thicker than normal.
Whip the egg whites on low speed in a clean bowl until foamy, then switch to medium-high speed until it holds soft peaks. Switch to high speed while gradually adding the granulated sugar. Continue beating until the eggs whites hold stiff, glossy peaks.
In another bowl, using a mixer with the paddle attachment (I don't have one so I used the regular beaters), beat the almond flour, icing sugar, and eggs on medium speed for 3 minutes or until light and voluminous. Sprinkle the flour on top and beat at low speed until it just disappears. Gently fold the egg-white meringue into the batter using a rubber spatula. Take a cup of the batter and fold it thoroughly into the melted butter in a small bowl. Pour this back into the batter and fold with a rubber spatula until just combined. Divide batter between the two pans (I used a scale to make sure each got the same weight of batter) and spread evenly with an offset spatula.
Bake cake layers for 5 to 7 minutes, or until lightly browned. As my layers were slightly thicker, I had to bake them for about 10 minutes. Let them cool for 15 minutes in the sheet pans, then slip them onto a cooling rack and let them cool to room temperature. They may be wrapped airtight and frozen if you have a big enough freezer for a month, but as the wrapping and stuffing into the freezer may deform them, I suggest that you go ahead with assembling the cake.
Coffee Syrup
In a small saucepan, combine water, sugar and coffee powder, and bring to a boil while swirling the pan to dissolve the ingredients. Remove from heat and allow syrup to cool. You may transfer it to a small airtight container and refrigerate for up to a week.
Coffee Buttercream
In small bowl, combine coffee powder and boiling water and stir until dissolved. Set aside.
In a mixer bowl fitted with the whisk attachment, beat the egg and egg yolk on high speed until pale and foamy.
In a small saucepan, combine the sugar and water, and swirl the pan over high heat to dissolve the sugar until it comes to a boil. At this point, stop stirring and cook over medium heat until it reaches 124°C (255°F or the hard ball stage- a very firm but sticky ball can be formed with your fingers from the cooled syrup). Without delay, dump the sugar syrup into the center of the egg yolks and whisk madly until combined, then turn the mixer on at medium-high speed and beat for about 5 minutes or until the mixture is thick, satiny, and at room temperature.
Beat the butter with a fork or whisk until it is soft and creamy, but not oily. Start beating the egg yolk mixture again at medium speed and add the vanilla extract, coffee syrup (prepared in the first step above), and butter to the egg yolk mixture in 2 tablespoon chunks. Raise the mixer to high speed and beat the buttercream until it's thickened and satiny. At some point the buttercream might look curdled or separated-- don't worry and just continue beating at high speed; it will come together magically. Transfer the mixture to a container, then cover with cling film and refrigerate, stirring occasionally, until it is firm enough to spread. You may freeze this in an airtight container for up to a month or refrigerate for up to a week, but let it come to room temperature before using and beat at high speed until it regains its satiny texture.
Ganache
Put the chocolate in a medium bowl. In the microwave or a small saucepan, bring the milk and cream to a boil, then pour over the chocolate all at once. Let the chocolate melt for 30 seconds, then gently stir in widening concentric circles with a spatula (being careful not to create bubbles) until smooth. Let the chocolate cool until just barely warm (60°C or 140°F). While the chocolate is cooling, work the butter in a small bowl with a spatula or fork until smooth and creamy. Add the butter to the cooled chocolate in 2 or 3 additions with a spatula. Don't worry if it looks very liquid at this point. Cover and refrigerate until it's firm enough to spread. You may freeze or refrigerate as with the buttercream, but if frozen, let it thaw in the refrigerator, then stir until smooth.
Assembly
Measure out the length of the smaller joconde (if they unfortunately did not come out the same size, but if they did, hurrah) and very cleanly cut a third of it off. You will get a roughly square piece and a rectangular piece. Cut off the same length from the other joconde sheet.
On a 10" square cake board, lay one of the joconde squares on top. Brush evenly with the coffee syrup, using about 3 tablespoons. Spread half the buttercream on top with an offset spatula, making sure it's very even. Carefully place the 2 joconde rectangles side-by-side, cut edges adjacent, on top. It will be roughly the same size as the joconde square below it. Brush evenly with the coffe syrup, using about 3 tablespoons. Using an offset spatula, spread all the ganache very evenly on top. Place the second joconde square on top and moisten again with coffee syrup. Freeze the cake for 20 minutes to allow it to firm. Spread the remaining buttercream on top with an offset spatula, making sure the surface is as even and smooth as you can manage. Refrigerate for at least 1 hour or freeze for 20 minutes.
Chocolate Glacage
In a small heavy-bottomed saucepan or in a microwave-proof bowl, combine the cream, 150g water, and granulated sugar very well and bring to a boil over high heat or microwave on HIGH until it boils (I think it took about 3 minutes, watch carefully). Whisk in all the cocoa and return to a boil. Take off the heat. Rap the bottom of the container on the counter to remove large bubbles. Using a small teaspoon, gently plunge it into the center and stir slowly and gently in widening concentric circles while lifting the spoon gradually out into the surface. Once it reaches the surface of the glacage, lift the spoon out and repeat (this isn't an official technique as I just made it up to coax bubbles out of the glacage while stirring any undissolved cocoa into it). Cool the glacage to 43°C (110°F)-- this will take a very long time, be patient. While the chocolate is cooling, sprinkle the gelatin over the 30g of water in a small bowl and leave to absorb all the water. Once the glacage is cool enough, microwave the gel on LOW for a few seconds until it dissolves (or over a pan of hot tap water). Stir the gel into the glacage gently but thoroughly-- it should have no problem as both mixtures are warm. Cool the glacage to 24°C (75°F)-- since I live in the tropics, once it cooled to room temperature, I placed it in the fridge and kept a close eye on it. Once it's sufficiently cool, pour it through a fine-meshed sieve placed close to the surface of the cake until the whole top is covered. Place in the refrigerator to set.
Once set, take a long, clean, sharp knife and cut about half an inch off all the sides to reveal the layers, making sure to wipe the knife very clean in between cuts (eat the sides as your reward). Chill until serving time, then cut into squares and serve. I decorated it with a poorly-made melted chocolate G-clef and Guylian marbled chocolate shells. The traditional decoration is the word "Opera" in script, gold leaf, or other musically-themed stuff.