Red Velvet Cake
I have to begin this by apologizing to my friend Noah. After being enamored by Sonia's Red Velvet cupcakes, he has wanted me to make some for him, but I always showed my intense skepticism due to the amount of red food coloring added to it in the recipes I researched. The range is from 1 tablespoon (15mL or about a vial of food color) to 1/4 cup (3 vials of red food color). Factor in my opinion that red food color tastes like shit, and I successfully discouraged him.
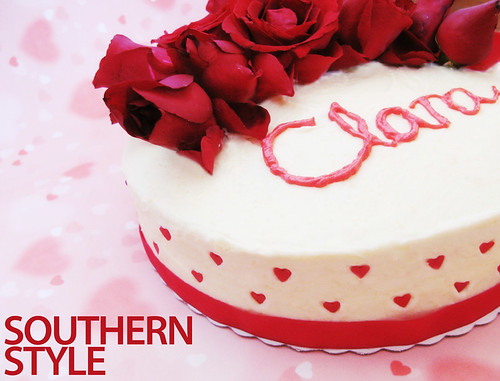
However, when Clara (Faith's sister) requested that I bake her birthday cake for her surprise birthday party, I had to ask the questions. What's her favorite flavor? What did she value most? What are her favorite things? What I got was chocolate and Hannah Montana. Faith later specified that the party was going to have a "Red" theme (a color as a theme?), and that Clara loves heart patterns. I didn't want to make a chocolate cake with all-red icing (that would be lame, plus the icing would possibly taste horrible-- you know what I'm talking about), and pink was not a possibility. I had to finally cave and make Red Velvet Cake, touted by an unnamed few as "the best cake they've ever tasted." What's all the fuss about? (Recipe follows)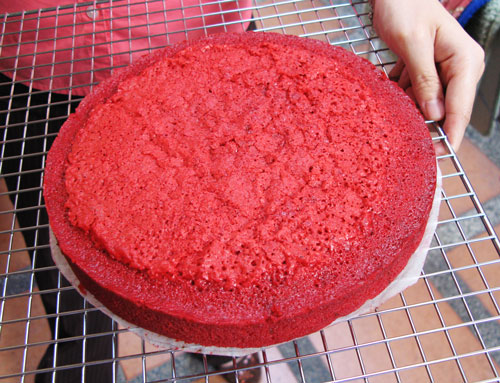
Faith showing off the bloody cake.
In addition to my initial fears, it was time again to exercise my cake-decorating muscles. I decided to stick with the old standby of cream cheese frosting to achieve perfection of red-velvetness. The result is an über-moist cake with shocking bright redness. It got raves, and best of all, its presentation was a show-stopper. For the decoration, I used heart-shaped candy sprinkles, only slightly sweet but very, very red (and only P40-- 40p or $1). I've learned a foolproof method for frosting the top and sides evenly with minimal mess, and I think I'll adopt it from now on. JC and Faith wanted to help out in making the cake (despite JC barely being able to separate eggs), so I busted out the aprons and we got to work!
The recipe here is adapted from Jaymes' version at the eGullet forums.
Wear an apron throughout the baking process. Preheat the oven to 325°F (160°C). Grease the bottom and sides of 2 9-inch cake pans, line the bottom with parchment paper, and grease the paper too. Sift together the cake flour, cocoa, and salt into a bowl. In another large bowl, place the oil and sugar together and beat at medium speed until well-blended. Beat in the eggs one at a time. Switch to low speed and slowly add the red food coloring and vanilla to avoid splashing. Stop the machine once well-combined. Sprinkle 1/3 of the flour mixture and beat over medium speed for 10 seconds. Add 1/2 of the buttermilk and beat for 10 more seconds. Continue with 1/2 of the remaining flour, the rest of the buttermilk, and the rest of the flour (when adding the flour, I actually folded it in and did not use the mixer to maximize the cake's tenderness). Scrape down the sides of the bowl and beat until just combined, 10 seconds on medium speed.
Place the baking soda in a small dish and add the vinegar. Quickly beat into the batter over medium speed for 10 seconds. Divide the batter among the pans (use a scale if you have one to be sure). Place in the oven and bake for 40 minutes, or until a toothpick inserted through the center comes out with very few tiny moist crumbs. The cakes will not dome. Cool in the pans for 15 minutes. Unmold, peel of the parchment and replace it on the cake bottom sticky side-out, then flip each cake right side-up onto a cooling rack. Let cool to room temperature, about 1 hour or more.
Beat the cream cheese with the butter until smooth. Add the sugar and beat until very smooth.
Spread about 2/3 cup of the frosting on whichever cake is flatter and spread evenly with an offset spatula. Place the second layer on top. Using as little cream cheese frosting as possible to get a very thin crumb ("primer") coat, coat the top and sides. Place in the refrigerator for 2 hours or in the freezer for 30 minutes. Meanwhile, keep the frosting in the refrigerator.
After the chill, stir the frosting to loosen it up, then load into a pastry bag fitted with a plain tip. Place the cake on a decorating turntable or lazy susan if you don't have one (you can also just go around the cake yourself; get a turntable if you're serious about decorating cakes in the future). Pipe the frosting up and down the sides of the cake in a zig-zag fashion, the lines as close as possible to each other and reaching the top and bottom of the cake as close as possible. Pipe a spiral of frosting on the top of the cake, the circles touching each other as closely as possible. With a long metal icing spatula, lay it on top of the cake and spin the cake around to smooth the icing, making sure to wipe down the blade if it takes you more than one stroke. With the spatula or a bench scraper (warmed in hot water and wiped dry, which is what I used), appose it lightly against the side of the cake and spin the cake to smooth the sides.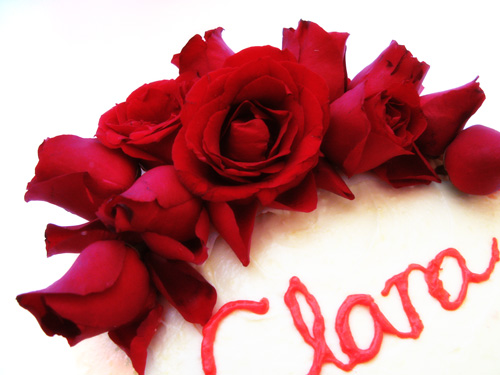
To place fresh flowers on the cake, wash and shake dry a dozen roses or other flowers. Get ones without pesticides (or pests, mind you) and have not been in formaldehyde. Cut them off 1/4 inch below the sepals. Lay a piece of parchment paper over the area of the cake where you want the flowers to be for added safety. Stick a toothpick halfway into the fleshy part of the calyx and poke the other half of the toothpick through the parchment and into the cake. Take apart one of the flowers and use the petals to hide exposed areas of parchment paper, attaching them with leftover frosting. Once you add the flowers, the cake will have to be refrigerated till serving time.
You can push the sprinkles into the icing if you have them. Wilton is a brand that offers them. Make sure you have a system for adding them; I placed the first 4 diametrically opposite, then filled in the gaps at regular intervals. The ribbon at the bottom is regular fabric ribbon from the bookstore, to be taken out just before cutting the cake.